Thursday, December 3, 2009

Common Header and Footer with Sub Template – Part 4

This is the last post for this Sub Template series. Thanks for your reading!

Before moving to a different topic, I just wanted to post some little tips around the Sub-Template.

Dynamic Report Title, Not Hard-coded

The header section often contains a report title, which should be

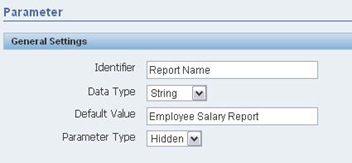
unique per each report, so you don’t want to hard-code the title in the common header. While there are many other ways to make this dynamic, I usually use the report parameter in the BI Publisher Edit UI to type the report name like shown in the picture below and get the value in the XML data file so that you can just use the place folder in the RTF template like <?REPORT_NAME?>.

Snap2

Make sure you select ‘Hidden’ as the Parameter Type so that the users don’t need to see this parameter in the report view window.


One Sub Template for Both Header and Footer

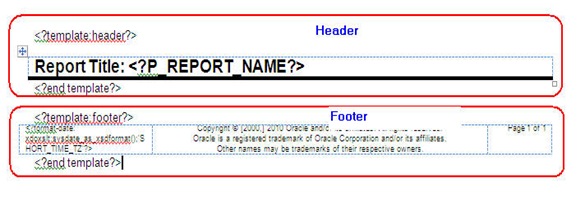
You don’t need to have separate sub-template files for each section, for example, one for the header and one for the footer. Instead you can have just one sub-template file and contain two sections in the same template file, one for the header and one for the footer. And then you can name the header section as ‘header’ and the footer section as ‘footer’ so that you can call them separately in the main RTF template.

Sub TemplateSnap4

Main Template


<?call-template:header?>

Body


<?call-template:footer?>

Tuesday, November 24, 2009

Common Header and Footer with Sub Template – Part 3

You have followed my last few posts but somehow it’s not working… Yep, that can be possible and probably the following two settings would be the cause for why it’s not working. Take a look and try that out! 

Set Proxy Server for HTTP Option

If the BI Publisher is running inside the firewall then you need to set your Proxy server to your JVM for the HTTP option to work. Here is an example of how to set that for your deployment with OC4J server.

Edit OC4J Startup File

1. Open the <Oracle_Home>\oc4j\bin\oc4j.cmd file.

2. Locate the following lines starting with ‘set JVMARGS…’:

set JVMARGS=-Djava.library.path=C:\oracle\bi\server\Bin;C:\oracle\bi\web\bin-DSAROOTDIR=C:\oracle\bi

-DSADATADIR=C:\oracle\bidata -XX:MaxPermSize=128m -Xmx512m %OC4J_JVM_ARGS%

3. Insert the following string after the 'set JVMARGS=' part of the line:

-Dhttp.proxyHost=<proxy.mycompany.com> -Dhttp.proxyPort=80

4. For example, after inserting the above string, the new 'set JVMARGS=' line should look like the following:

set JVMARGS=-Dhttp.proxyHost=<proxy.mycompany.com> -Dhttp.proxyPort=80

-Djava.library.path=C:\oracle\bi\server\Bin;C:\oracle\bi\web\bin -DSAROOTDIR=C:\oracle\bi

-DSADATADIR=C:\oracle\bidata -XX:MaxPermSize=128m -Xmx512m %OC4J_JVM_ARGS%

Restart the server

After editing the command line file you need to restart the OC4J server to apply the proxy server setting.

Enable External References for File Option

When you import the sub-template you need to set ‘Disable external reference’ option to be ‘False’ to allow the main RTF template to be able to reference the Sub-Template file.

1. Open the report and go to Configure page.

2. Change the ‘Disable external reference’ value to ‘False’.

Snap1

Hope now all of your reports are working fine with your Sub-Template!

Common Header and Footer with Sub Template – Part 2

Construct Reference URI Dynamically

When you reference the Sub-Template from the main template you need to specify an absolute path to the Sub-Template file with either the http or file option in the Import syntax. This is easy when you are developing your reports at your local machine or the development instance. However, sometimes you don’t know where the Sub-Template files will end up being located. For example, your production environment probably will be a different server and have a different directory (or folder) structure. So you don’t want to hard-code the http or file path to the Sub-Template, which you don’t know where it will be at for your deployment. Otherwise, you need to go visit each single RTF template file to update the location path.

There is a limitation that you cannot get a value from the XML data and assign it to the Import syntax. However, you can assign values from BI Publisher’s pre-defined properties or custom properties that you can create both at a server and a report level.

Today, I will go through the steps to make your File or HTTP path dynamic so that the Sub-Template implementation can be independent from any instance and be easier to maintain.

How to Construct URI with Property

Here is the default ‘import’ syntax where you set the absolute path to the Sub-Template file as we saw yesterday.

<?import:http://knishida-lap.us.oracle.com:9704/bip/Header_Sub.rtf?>

Now, you don’t know where the Header_Sub.rtf file will be at a testing or production environment. Or you might need to change the above server location in future. So you want to make the above path dynamic.

This is where the custom property comes in to rescue. I will show you how to set the custom property later, but for now, let’s assume we have a custom property called, ‘HTTPSERVER’, and the value is ‘knishida-lap.us.oracle.com:9704/bip’.

You can use a dollar sign and surround the property name with curly brackets (e.g. ${HTTPSERVER}) and embed it into the path like below.

Example :

<?import:http://${HTTPSERVER}/Header_Sub.rtf?>

When a value of the property ‘HTTPSERVER’ is set to ‘knishida-lap.us.oracle.com:9704/bip’ the above ‘import’ syntax will be dynamically constructed as

<?import:http://knishida-lap.us.oracle.com:9704/bip/Header_Sub.rtf?>

at the report generation time.

How to Set Custom Property

Now how to set the custom property?

Here is a list of the step on how to set the custom properties at the BI Publisher server level.

1. Create a custom configuration file, xdo.cfg, if you don’t have it yet, and add the following line.

<config version="1.0.0" xmlns="http://xmlns.oracle.com/oxp/config/">

<!-- Properties -->

<properties>

<property name="xslt.HTTPSERVER">'knishida-lap.us.oracle.com:9704/bip'</property>

</properties>

</config>

2. Place the xdo.cfg under %BIP_REPOSITORY_HOME%/Admin/Configuration

If your BI Publisher Repository root is ‘C:\OracleBI\xmlp\XMLP’ the xdo.cfg file should be located at

C:\OracleBI\xmlp\XMLP\Admin\Configuration

3. Restart the Application Server (e.g. OC4J) to take the property setting in effect.

Additionally, you can also set this property at the report level. In this case you can locate the xdo.cfg file at the same folder where the BI Publisher report definition file (.xdo) is located.

That’s it, now you are set with the custom property so try testing it!

When you need to deploy your reports to another instance like Testing or Production then you need to make sure that the custom property is set at the server level. Once the property is set then all the reports using the property in the Sub-Template import syntax should work without any hassle!

Lastly, there are some pre-defined properties that you can use in the import syntax. This can be useful especially when you have a different set of Sub-Template files for each language and you want to import an appropriate template based on the user’s session language setting.

Pre-Defined BI Publisher Property List

Here is a list of the BI Publisher’s pre-defined properties.

  • _XDOCALENDAR
  • _XDOLOCALE
  • _XDOTIMEZONE
  • _XDODFOVERRIDE
  • _XDOCURMASKS
  • _XDONFSEPARATORS
  • _XDOCHARTTYPE
  • _XDOOUTPUTFORMAT
  • _XDOSVGFONTEMBED
  • _XDOCTX

All the locale related properties values are coming from the user’s preference setting at the BI Publisher Server.

That’s it for today. Happy Thanks Giving!

Monday, November 23, 2009

Common Header and Footer Style with Sub Template

When you develop a report you usually want to have a header and footer section. And when you develop more reports you probably copy and paste the header and footer section from the first report so that all the reports will have a same look and feel with a company logo, report title, reporting date, copy right, etc.

Now you have developed a lot of reports with the same header and footer and you need to change the report title font size or need to change the company logo in the header section, what would you do? Imagine if you have 100 reports already developed! Obviously you don’t want to visit every single report and make such changes in each of the RTF templates.

In order to avoid from visiting each of those hundreds of the reports you wish having just one common header and footer template, in which you can design the header and footer and you can import from all the reports you have. When you need to make such changes for the header and footer only you need to do is to visit only this common header and footer template and make the change. How easy!

This is a very common requirement for any reports development with BI Publisher and BI Publisher addresses this type of requirement with its Sub-Template feature. But somehow it can often be slipped out from the reports design until you hit this maintenance concern mentioned above. I guess that’s because our main focus is how to bring the data into the report and design the layout and formatting for the data when we start the development and we just want to get our report done without taking an account of the long term maintenance perspective.

Also this is not really well documented as a practical and best practice way. There are many information about this common template (called Sub Template in BI Publisher) out there but it’s not really clear as a complete picture of how to implement it and deploy to a real environment.

So here comes the post I’m writing today. I’m writing this using an example of the header and footer, but as you can imagine it doesn’t have to be only for the header and footer. Anything you want to have in a central place and apply to all the reports you can apply this information.

Sub-Template as Common Template

With BI Publisher you can use a Sub-Template feature to create the common template where you can design common objects such as the header and footer. The Sub-Template can be a RTF template or XSL style sheet, which can contain common formatting and layout information, and can be imported from any reports. So for example if you want to have a same header layout then you can design the header in the Sub-Template file and import the header, which you just designed in the Sub-Template, from all of your RTF template files. When you get a new requirement or modification request for the header then you can only modify this one header in the Sub-Template file and no extra work needed.

Common Template Development

Here is a list of the steps how you can implement the common Header and Footer Sub-Template.

Steps:

  1. Create a Sub-Template for the Header and Footer
  2. Locate the Sub-Template at a Web Server or file system that BI Publisher server can access to
  3. Call the Sub-Template from the main templates
  4. Call the header or footer section


Create a Sub-Template for the Header and Footer

You can create a new RTF template and use a ‘template’ syntax to design the header or footer layout and formatting.

Template Syntax:

<?template:%template_name%?>

There is a starting syntax (<?template….?> and ending sytax (<?end template?>), so you need to design the header or footer layout first then surround it with the starting template and the ending template syntax.

Example:

<?template:header?>

Header contents should be here…

<?end template?>


Locate the sub-template at a common directory (folder), which BI Publisher server can access to

Once you created the sub-template now you can reference it from the main RTF template files. It can be referenced by either File or HTTP option. The File option is to locate the sub-template file on the file system, which means the sub-template needs to be on the same machine where the main template files are. The HTTP option is for the sub-template to be accessed through HTTP so the sub-template needs to be on a web server and it should be accessible from other machines with HTTP.

Call Sub-Template

Import the sub-template from the main templates

First, you need to import the sub-template in the main RTF template. You can import either with File or HTTP option. This import statement needs to be set at the very beginning of the file.

Here is the example:

Example with File reference:

<?import:file:/// C:\BIP\SubTemplate\common_template.rtf?>

Example with HTTP reference:

<?import:http://knishida-lap.us.oracle.com:9704/bip/common_template.rtf?>

Call the header or footer section

Once you imported, now you can use ‘call-template’ syntax to call and embed the header or footer layout and formatting at the header or footer section in the main template.

Example:

<?call-template:header?>

And, that’s it! Now you have a common header and footer template and can apply it to any report you have. Very simple.

I will discuss tomorrow about some best practice on how to deploy and tips. So stay tuned!

Wednesday, November 18, 2009

Dynamic Date Parameter – Current Date

This is actually really not known trick maybe it is not documented in the user’s guide yet, but BI Publisher supports a ‘dynamic date parameter’.

WHAT???

Ok, so don’t you want to set the default date for the date parameter of the report and make it to be a today’s date or a week before or something ? Or, don’t you want to schedule your report and want it to generate always the last 7 days of the data ?

Yes, here comes the dynamic date parameter!

For example, you can use a current date function (sysdate()) to set a today’s date for your date parameter so that the date will be set always to today’s date depending on when you open the report. So if you open the report today the date would be 11/18/09, if you open tomorrow then it would be 11/19/09.

This would be even more critical when you want to set the date parameter values for your scheduling report. For example, you might want to run a report on every Monday to display the data for the last 7 days. You can’t hard-code any date to the date parameter of the report because then the date range will get too old and invalid. In order to get the last 7 days of the data in SQL world, typically you set a start date to be ‘sysdate – 7’ and an end date to be ‘sysdate’. Yes, you can do the same thing with the BI Publisher’s scheduled report by doing exact the same but setting such parameter values from the scheduler edit window. BI Publisher generate the appropriate dates based on the dynamic date function and pass them to the underlying sql query.

BI Publisher supports not only the current date (sysdate) function but also other types of functions for commonly used dates.

  • SYSDATE()   - Today’s date
  • FIRST_DAY_OF_MONTH() - First day of the current month
  • LAST_DAY_OF_MONTH()  - Last day of the current month
  • FIRST_DAY_OF_YEAR()  - First day of the current year
  • LAST_DAY_OF_YEAR()   - Last day of the current year

And here is some example…

Set Default Date to Current Date

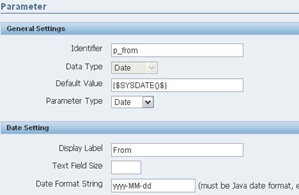
In order to use the above date functions you need to enclose it with curly bracket and dollar sign such as ‘{$SYSDATE()$}. You can simply type this in the ‘Default Value’ text filed in the report edit window.

default_date

You can also have some simple calculation with the date functions. For example, if you want to set the default date to be 7 days before the current date, then you can type ‘{$SYSDATE()-7$}’. Plus (+) and minus (-) are supported for the calculation.

Set Dynamic Date for Scheduled Report

You can also set the date parameter values using the above functions. For example, if you want to schedule a report and want the report to generate the last 7 days of the data, then you can set the From Date to be ‘{$SYSDATE()-7$}’ and To Date to be ‘{$SYSDATE()$}’

default_date_schedule

Or, if you want to run the report to always return the month-to-date data then you can set the From Date to be ‘{FIRST_DAY_OF_MONTH()}’ and To Date to be ‘{$SYSDATE()$}’.

Just a useful trick if you haven’t known!

Tuesday, November 17, 2009

JNDI for BI Server – Part 2

This is a follow up for the post I’ve written some time back about the JNDI data source for the Oracle BI Server.

Recently I’ve had a chance to revisit this subject when one of our clients had a performance issue with their BI Publisher reports. The issue was that when they were trying to open a report it takes a long time to get the page with all the parameters. This issue became to be worse when they started testing with multiple users at a same time.

So first, we looked at the report and found it had many parameters which were using SQL queries, some were going against a Oracle database and some were going against BI Server with JDBC. This is a very typical report but can be a cause for the bad report performance.

Every time you run a BI Publisher report it creates a new connection for each query. So if you have 5 SQL base parameters, that means BI Publisher opens 5 connections separately without sharing the connection even when all or some of the queries are going against the same data source.

In order to address this issue we usually recommend to use JNDI data source. You can create a JDBC data source connection pool at the application server level and register it as JNDI, and you can use it from BI Publisher. This way your SQL queries in the reports and parameters can share the same connection through the JDBC connection pool.

Now, what if you need to pass the BI Publisher’s session username to the data source to get authorized or filter the returned data ? You can check the ‘Proxy Authentication’ check box to enable the proxy authentication, which pass the BI Publisher’s session user information to the data source.

Proxy

However, this, proxy authentication with JNDI for Oracle BI Server, is not supported when the data source is Oracle BI Server with the BI JDBC.

That means, again, when you have 5 parameters, all of which are querying against a same BI Server, BI Publisher needs to open the JDBC connection 5 times! This obviously has significant performance impact especially when more users accessing the same or similar reports.

Well, the good news is, the BI Publisher product development has fixed this issue already by implementing a way that BI Publisher shares the connection for the parameter queries instead of opening and closing for each parameter. This means, you don’t need to use the JNDI connection for the BI Server to improve performance anymore. You can keep using the JDBC connection and set the ‘proxy authentication’ if needed. This fix is available in the latest BI Publisher’s October patchset release, which can be downloaded from our support web site. The patch number is 9017232. 

I would still recommend to use JNDI connection for other reasons as I described in the previous post, but to improve the performance of the parameter values rendering now we don’t need to worry about thanks to this new implementation!

Monday, November 16, 2009

Query is cancelled with BI EE, Why?

Have you ever had a situation where your BI Publisher report, which is using BI Answers as the data source, is returning no result with a message ‘The query was cancelled.’ after around 5 mins?

One of our top BIEE/BI Publisher consultant, Sandeep Bade, encountered this issue at one of his projects and found out why and the solution.

There is a BI Presentation property called, UnaccessedRunningTimeoutMinutes, which controls the time BI server allows the query to run when there is no user interaction. The default value is set to 5 mins and this is why the BI Publisher report querying against BI Server gets cancelled automatically when the query is taking more than 5 mins.

You can set this value to more than 5 mins and restart the BI Presentation Server, now your long running BI Publisher reports should return you the result!

You can add the following line in the instanceconfig.xml and change the value.

e.g.

<UnaccessedRunningTimeoutMinutes>60</UnaccessedRunningTimeoutMinutes>

Wednesday, September 2, 2009

What Administrators Should Do for Siebel Reporting with BI Publisher?

There are a couple of things you want to perform as Administrators to manage the Siebel Reporting environment and maintain the BI Publisher reports in Siebel. Here is a list of the tasks that the Administrators should be responsible for.

  • Purging Siebel Reports
  • Optimize Siebel Reporting Environment
  • Enabling Logging for Debugging

Purging Siebel Reports

When the users run the Siebel reports all the generated reports output files will be stored on the Siebel database. These files can be opened from the ‘My BI Publisher Reports’ menu. However, at a certain point of time you might want to delete some of the files due to the size of keeping all the reports on the file system and also due to a compliance matter.

You as Siebel Administrator can purge such report files from the Siebel database using filters or by running a workflow process. I’m going to talk about how to set up reports to be automatically or manually purged.

Automatic Purge

You can set up to automatically purge your reports from the Siebel database after a specified time interval. The ‘BIP Delete After Days’ system preference allows you to specify any non-zero positive value that executes the Auto Purge workflow to purge the reports. Based on the value that you enter, the reports are purged from the database after the number of days specified.

To automatically purge reports

  1. Log in to the Siebel application with system administrator privileges.
  2. Navigate to the Administration - Application screen, then System Preferences view.
  3. In the System Preferences list, select ‘BIP Delete After Days’, and change the value to any positive nonzero value.
    By default, the value is set to -1 (minus 1), which means it never purge.

    BIP_Delete_After_Days
  4. Navigate to the Administration - Server Management screen, then Jobs view.
  5. Add a new job
  6. Click the search icon to select ‘Workflow Process Manager’
  7. Click 'New’ button to add a Job Parameter to the job
  8. Select Workflow Process Name for the name
  9. Type ‘XMLP Purge Records’ as the value
  10. Click Submit.

Alternatively you can schedule this job to run periodically using the Siebel workflow, see Siebel Business Process Framework: Workflow Guide for the detail.

Manual Purge

When manually purging Siebel reports, you can specify criteria by which the reports are purged. Reports meeting that criteria will be removed from the Siebel database. You can also purge multiple reports together by selecting a date range, the reports that were generated within the specified date range will be purged. If both the report name and the date range are entered, then only those reports with that name and that were generated within that specified date range are purged. You can also purge reports for a specific user by entering his/her user ID as the criteria.

To manually purge a report:

  1. Log in to the Siebel application with system administrator privileges.
  2. Navigate to the Administration - BIP Reports screen, then Purge Administration view.

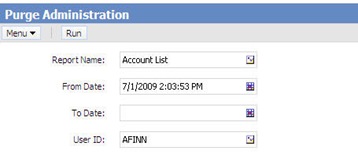
    Purge_Admin
  3. In the Purge Administration form, you can select a report name, type From Date, To Date, and select User ID. You don’t need to fill all of them. Whatever you enter will be used as a criteria to select the reports to be purged.
  4. Click Run.
    The reports that meet the specified criteria are purged.

Optimizing Performance for Siebel Reports

Now the next topic is to optimize the Siebel Reports runtime environment to have better performance and scalability. There are several attributes that you can use to best fit to your reporting and system requirements from performance and scalability perspective.

Here is a list of the attributes.

  • Report Execution Wait Time
  • Server Request Processor Wait Time
  • Setting Concurrency Parameters
  • Max Fetch Size (DSMaxFetchArraySize) for Large Data Volumes
  • Enabling Scalable Mode
Execution Wait Time

By setting this threshold value you can cancel some of the reports, which would take longer than the specified time duration, to run. In some cases some reports might take a long time and when you have multiple reports taking long time at the same time other users might have to wait for those reports to finish the jobs. Typically such long running reports should be executed at when most of the users are not accessing such as at night time as a batch process, but there is no control to prevent the users to run such reports as long as they have access to them. So you can use this attribute to control such.

Here is a list of the steps to set the Report Execution Wait Time for Siebel Reports

  1. Navigate to the Administration - Application screen, then System Preferences view.
  2. In the System Preferences list, select BIP Report Wait Time, and then change the value to any number greater than 100. By default, the threshold is set to 100 seconds.
Setting the Server Request Processor Wait Time for Siebel Reports

Some times your database doesn’t respond due to heavy duty work currently being performed at the database or simply not available. Or there is a quick temporary issue on the network. Whatever the reason your report request trying to access to the database might not getting any response back. Typically the applications try to reconnect to the database after a certain waiting time. You can control this waiting time with this setting.

Follow the steps below to set the Server Request Processor Wait Time for Siebel Reports

  1. Navigate to the Administration - Server Configuration screen,  Servers, and then Components view.
  2. In the Components list, select Server Request Processor (alias SRProc).
  3. Scroll down and click the Parameters subview, and then click Hidden.
  4. In the Parameter list, select Database Polling Interval, and change value from 10 to 1. The Value on Restart and Default Values are updated as well.
  5. Restart the Siebel Server.
Setting Concurrency Parameters for Siebel Reports

You can set a maximum number of tasks per XMLP Report Server, which is not the BI Publisher Enterprise but it’s the engine that takes care of the report request and response within the Siebel, per a single Siebel server. Also you can set a maximum number of MT (Multi Threaded) Servers per a single Siebel server.

Typical guideline would be:

  • MaxTasks = peak (concurrent users)
  • MaxMTServers = MaxTasks / 100

So, for example, let’s say you have 1000 users accessing to the reporting at the same time then the MaxTasks would be 1000 and the MaxMTServers would be 10. Note that this is a generic guide line and these numbers should not be used as a static number for your environment. Each environment and reporting needs would impact on the above numbers and requires a series of performance testing to come up with the best numbers.

You can follow the steps below to set concurrency parameters for using the GUI

  1. Log in to the Siebel application with administrator privileges.
  2. Navigate to the Administration - Server Configuration screen, Servers, and then Components view.
  3. In the Components list, select XMLP Report Server.
  4. Click on the Parameters view tab and set accordingly.
Optimizing Performance of Siebel Reports for Large Data Volumes

When you have a large data coming back for your reports then you can set a Data Source maximum fetch array size (DSMaxFetchArraySize) profile parameter value to ‘-1’ so that the size is unlimited. But again, this value should be fitting to your specific environment so you might want to increase the value to a certain threshold instead of setting it as unlimited.

You can follow the steps below to optimize performance of Siebel Reports for large data volumes

  1. Navigate to the Administration - Server Configuration screen, Enterprises, and then Profile Configuration view.
  2. In the Profile Configuration view list, select Server Datasource (alias ServerDataSrc).
  3. Scroll down to the Profile Parameters, and then click Advanced.
  4. In the Profile Parameters list, select Datasource maximum fetch array size (alias DSMaxFetchArraySize), and then change the value to -1.
  5. Restart the Siebel Server.
Enabling Scalable Mode for Siebel Reports

When you have a large data volume or have complex XSL transformation logic you might want to enable BI Publisher’s XSLT engine to be scalable so that the engine will transform the raw data to XSL-FO template and generate the final output by using the hard disk instead of loading the file onto the memory space. In this way you can avoid ‘out-of-memory’ related issue at the BI Publisher’s reports generation process. You can enable the scalable mode parameter by configuring the BI Publisher’s configuration file, xdo.cfg file, which is located under the %JRE_HOME%\lib directory, where JRE_HOME is the one used for BI Publisher Enterprise Server.

To enable scalable mode for Siebel Reports

  1. Navigate to the jre\lib installation directory.
    NOTE: The path for the Java installation folder varies depending on where you installed JRE.
  2. Open the xdo.cfg file, and in the <Properties></Properties> tag, use the following syntax to set the Scalable Mode property to true (if not already set):
    <property name="xslt-scalable">true</property>
    NOTE: You can set Scalable mode to either true or false.
  3. Save the xdo.cfg file.
  4. Restart BI Publisher Server

Next

There are a few other critical things you can do as an Administrator such as Migrating the reports from Development environment to QA/Production environment, Enabling Logging for Debugging.

But that’s it for today and I will talk about such topics tomorrow, so stay tuned!

Tuesday, September 1, 2009

Install and Setup BI Publisher for Siebel Reporting

Siebel Business Applications ship with pre-developed BI Publisher reports. Using views in a Siebel application, you can run such pre-installed reports or create your own custom reports in both the connected and disconnected modes. Please take a look at ‘Siebel Reporting Architecture with BI Publisher’ for the detail architecture of connected and disconnected modes. In disconnected mode, BI Publisher libraries are already installed as part of the Siebel installation by making the core libraries available (in $SIEBEL_HOME/CLASSES) for report generation. However, if you want to use Siebel Reports in connected mode through a Siebel Web Client , you must install and configure BI Publisher Enterprise Server.

So today I’ll talk about how to install the BI Publisher Enterprise Server for Siebel.

Step 1 – Make sure that you have installed necessary pre-requisite software

There are some different software pieces that you need to complete the Siebel reports with BI Publisher development.

  • MS Word

    BI Publisher uses MS Word to develop and design the report layout, RTF Template.
  • BI Publisher Desktop Client – MS Word Add-in (Template Builder)

    This MS Word Add-in called BI Publisher Template Builder provides you a graphical interface to help you develop and design the RTF Template easier and allow you to preview the report final output in many different formats. It is a MS Word Add-in that you launch from inside the MS Word.
  • Siebel Tools

    If you want to create a new Integration Object you need the Siebel Tools.
  • JDK (Java Development Kit)

    BI Publisher Enterprise Server is certified with JDK 1.5. or later so make sure you have installed the JDK 1.5 on a machine where you will install the BI Publisher Enterprise Server.

Step 2 - Download BI Publisher Enterprise Server

You can download the BI Publisher Enterprise Server media from Oracle E-Delivery page.

Step 3 - Install BI Publisher Enterprise Server

Once you have downloaded you can follow the installation guide. The installation itself is pretty simple straight forward for a basic installation. Once you click on setup.exe (for Windows) then you follow the instruction with the installation wizard to complete the installation. For an advanced installation I have written a few posts before, so please take a look at them for the detail.

Change the location of the BI Publisher repository (Optional)

Note that, by default, the Siebel application is looking for the ‘oracle.home’ JVM property value and wants to substitute the value inside the path. If you have installed the BI Publisher Enterprise Server with its embedded OC4 install option then this ‘oracle.home’ property value is automatically set by the installation. If not, then you need to manually change this value after the installation. If you are installation with WebLogic Server then you need to change this value before the installation. Please take a look at ‘Installation for Oracle WebLogic Server’ for the detail. 

How to Change ‘oracle.home’

Open WEB-INF/xmlp-server-config.xml file and change the following to the appropriate path.

<file path="${oracle.home}/xdo/repository"/>

Step 4 - Define the outbound Web service for the BI Publisher Server

  1. Log in to the Siebel application with administrator privileges.
  2. Navigate to the Administration - Web Services screen, then Outbound Web Services view. 

    Admin_webservice
  3. In the Name field, query for ‘PublicReportService’, and then change the BI Publisher Server machine name to your BI Publisher Server using the following format:

    :/xmlpserver/services/PublicReportService">:/xmlpserver/services/PublicReportService">:/xmlpserver/services/PublicReportService">:/xmlpserver/services/PublicReportService">http://<host.domain>:<port>/xmlpserver/services/PublicReportService

    where:
    host is the full path for your BI Publisher Server
    port is the port the BI Publisher Server uses

    Example:
    http://da78112.oracle.com:9074/xmlpserver/services/PublicReportService
  4. Verify that the BI Publisher Server is running and ready to start generating reports.

Step 5 - Copy JAR files to the BI Publisher Server

For successful report generation when running Siebel Reports, you must copy the custom Java classes—that is, the JAR (Java Archive) files—associated with individual reports. By default, these Java functions are not available on the BI Publisher Server.

To copy JAR Files to the BI Publisher Server

  1. Copy the following files from $SIEBEL_HOME/CLASSES to:
    OC4J_HOME/j2ee/home/applications/xmlpserver/xmlpserver/WEB-INF/lib

    - XSLFunctions.JAR
    - SiebelCustomXMLP.JAR
    - SiebelCustomXMLP_SIA.JAR 
  2. Enable external file references by performing the following tasks: 

    2.1. - Log in to the BI Publisher Server.
    2.2. - Click the Admin tab, and then select Runtime Configuration and Properties. 
    2.3. - Change the Default value for the Disable External Reference attribute to FALSE.
  3. Restart OC4J.

Step 6 - Enable Siebel Reports

Before using Siebel Reports, the XMLP Report Server Component component must be enabled. By enabling the XMLP Report Server Component, reports appear in the Reports Menu drop-down list in Siebel Business Applications.

To enable Siebel Reports

  1. Log in to the Siebel application with system administrator privileges
  2. Navigate to Administration - Server Configuration, Enterprises, and then Component Groups
  3. In the Component Groups list, select XMLP Report, and then click Enable.
  4. Click the Synchronize view tab, and then in the Component list, select XMLP Report Server
  5. Click Synchronize
  6. Restart the Siebel Server

Step 7 - Configure Database Authentication and Security

Siebel Reports supports the following two types of authentication:

  • Server Component-based authentication - Administrators must specify the BI Publisher user ID and password at the XMLP Report Server Component level.
  • External authentication (LDAP) - Administrators configure LDAP for both the BI Publisher Server and the Siebel Server. Using external authentication is optional.

In this post I’m going to talk about the ‘Server Component-based Authentication’. In order to call the BI Publisher’s web service you need to pass a pair of username and password. So basically you need to register a proxy user in Siebel so that the XMLP Report Server component within the Siebel application can use this proxy username and password to get authenticated first when it calls the BI Publisher’s web service to generate a report. The password can be encrypted.

To set the BI Publisher Server user ID and password

  1. Log in to your Siebel application.
  2. Navigate to Administration - Server Configuration, Servers, and then Components.
  3. Query for XMLP Report Server, and then select it.
  4. Click the Parameters tab and query for BIP*.
  5. Enter the user ID and password used to access the BI Publisher Server in the Default Value fields of the BIP Server Login and BIP Server Password parameters.

Step 8 - Configure Font Files

To make sure fonts display properly in Siebel Reports, you need to copy the font files, which you want to use in your reports, to a directory on the Siebel Server machine where the XMLP Report Server Component is enabled. This task is typically performed as part of the Siebel Reports installation. However, you can perform this task later or at any given time.

On the Siebel Server machine where the XMLP Report Server Component is enabled, copy the fonts you want to use for your reports from, for example, C:\WINDOWS\Fonts directory, to the $JRE_HOME\fonts directory.

That’s pretty much it. Tomorrow, I’ll talk about some tasks that you as Administrator want to perform for the Siebel reporting. So stay tuned! 

Monday, August 31, 2009

Single Source of Truth - BI Publisher in Siebel

I have written about Siebel reporting with BI Publisher and the reports conversion from Actuate to BI Publisher last week here. However, since the development group in Oracle has been working on some enhancements to improve the reporting and migration process better so at some point in future the information on those posts might become to be staled. So I’m listing the source of information where you can keep yourself updated with the latest information below. Please bookmark and visit them periodically or when you need.

I’ll talk about more about the Siebel reporting with BI Publisher with topics like ‘how to administrate the reports’, ‘how to setup the BI Publisher environment’, etc, from tomorrow, so stay tuned!

Thursday, August 27, 2009

6 Keys to Deliver Successful Reports Conversion Projects

Why Are We Doing This?

I hear often something like ‘we need to convert 100 numbers of reports within next two months, can you do it?’ Well, the answer might be Yes or No, it depends on budget, timeline, and other constraints. But more importantly, do we really need to convert all the 100 reports? We need to look at all the reports by asking, 'How many reports are really used today?’,  ‘How many of the reports are really meeting today’s business requirements?’ and ‘How are those reports serving or impacting their business?’. Without asking such questions and having clear answers, all the money and effort which will be spent for the conversion related work including project preparation, project delivery, production support and maintenance will not get much return, and the worst the project might not get enough sponsor support so that the it might be forced to shut down at the middle of the project.

Energize Your Users and Get Them Excited!

As I have discussed in the previous reports conversion related posts the reports conversion itself involves a lot of manual tasks and always requires a series of testing before going to a production. Also don’t forget that the reports conversion means you are introducing a new paradigm of the reporting system to your users who might have some resistance to move to a new system just because it’s new! and they’re not psychologically comfortable with it. So we need to think about how to support both end users and developers in a form of training, documentation, user group, discussion forum, etc so that not only they will be able to transform as easy as possible and minimize a business continuity risk impact, but also we can get them energized and excited and obtain a positive support and constructive feedback from them for even a bigger and wider project.

Bring the Values to Business!

The reports conversion initiative can be a great opportunity to review the existing reports and reporting framework including its management, administration, and maintenance process. You might be able to reduce huge numbers of the reports, which of course will have big impact on the maintenance and administration cost. Also, you might be able to optimize the reporting framework to server your business better. The new BI Publisher’s RTF Template base reporting design framework allows users to use their most familiar desktop tool, MS-Word, to design the reports layout, which means you can involve the end users to design the reports layout and formatting in more collaborative form and reduce a turn around time to meet their requirements. With the BI Publisher’s RTF Template’s flexible layout/formatting and calculation support, there might be some of the requirements that couldn’t have been done before but now can be done easily. BI Publisher’s separation of data and layout layers development approach allows developers or designers to work off-line mode so that they can work anywhere and anytime.

So here is, ‘6 Keys to Deliver Successful Reports Conversion Project’!

1. Clear Objectives and Value Proposition

It’s very important to set the objectives for the reports conversion project. Why are we doing the conversion ? Is that only because Actuate support will be expired soon ? Oracle has made the decision of converting the old reporting technology to the new BI Publisher base reporting system because there are significant benefits that would server our customers better. And such benefits should be able to be translated to ‘How can those benefits serve our business better?’

Such questions lead to a set of answers which should drive the reports requirements definition and reports and reporting system design. And they can be a base guideline for all the activities during the project hence it helps leading the project team together and deliver a consistent result.

2. Requirements, Requirements, Requirements!

Even though it might take an extra time at the beginning before you start the conversion itself it would be really beneficial for both the business and IT sides to collect and review the reporting requirements based on today’s business environment, and define the requirements in a form that both the business and IT can agree upon. And this will be a baseline for the whole reports conversion exercise including the design, development, system testing, UAT(User Acceptance Testing).

Also before you start the reports conversion you want to analyze the requirements to see how to implement them with this new BI Publisher base reporting technology.

3. Gap Analysis and Solutions Development based on Best Practice

You have two different technologies, old reporting system and new reporting system. This means two different methodology to implement a same requirement.  When you find the gaps between the old and new technology and develop solutions for them then they should be shared with other developers and projects so that each developer won’t need to invent the wheel every time. Also sometimes you might have possibly many ways to implement a same requirement with BI Publisher, so it’s important to analyze which options would be the best and why. These solutions can be used for many requirements and have huge impact on both maintenance and performance.

This analysis requires BI Publisher’s expert and best practice but once you have established that then the conversion process itself would be less stressful and most importantly more predictable hence easier to plan and less surprise!

3. Incremental Release, Not Big Ban

When you need to convert many reports, for example, 100 reports, it would be better to separate into small chunk of the reports sets and have a different releases schedule, maybe by department, by audience type, by reporting type, or by priority. In this way the business can recognize the value of the conversion initiative sooner and can provide valuable feedback that might have impact on the conversion strategy and reports design methodology. Again, you are going to bring a great value to your business by delivering this conversion initiative so close and continuous collaborative working relationship with the business is critical and it’s important to check if the work is aligning with the objectives and serving your business better. By focusing on a smaller user audience not just you can deliver the converted reports sooner and support them better but also you can have them on your side to promote the initiative to bigger audience for your next phases of the project. I would say three months would be typically the maximum to deliver. If it goes more than that then the business requirements would be changed and harder to manage them hence more chance to deliver something that can not serve your users.

4. Right Resource at Right Place

By this time I’m sure you’re fully aware of it, but again, the reports conversion is not just a magic that is supported by some kind of technology or methodology. It involves many phases and different types of works in order to deliver it successfully as the same way you deliver a reports development or any other projects. Therefore it requires different types of resources and you want to allocate them at a right timing and a right place and with right combination. Here is a list of the resources that would contribute the success.

  • Project Manager
  • Business Users/Analyst
  • Functional Developers who are familiar with the backend application and the source tables such as EBS, Siebel, PSFT, JD Edward, etc.
  • BI Publisher - BI Publisher has many technology but you want this BI Publisher resources who have extensive experience especially in RTF Template development

And of course, usual resource requirements for any project delivery applies such as project sponsors, system administrators/DBA, etc.

5. Well Thought and Active User Support

Again, the reports conversion will introduce a new reporting system to your users who have already accustomed to the older reporting system. The way they look at the reporting has already been established on the older system. So it will be high possibility that the users will get confused or start building a negative impact on the initiative. It’s important to understand how the users are running their reports and managing them today from their perspective. And starting from the perspective we need to identify what would be the gaps in terms of the usability and reporting procedure and build a custom training plan to address such gaps. Also, the benefits of what the new reporting system can offer often not been recognized fully by the end users or even by the developers! So it is important to translate the benefits into their daily business environment and educate the values with their language. And if you start with a smaller release with a limited number business users then they can help you to develop such training and to translate and sell the values to the business.

Also, it would help if you start hosting a user support group session at weekly or monthly where the users can throw questions or discuss requirements and solutions. What we have internally is a wiki site where we post any tips/techniques, best practice, FAQ, troubleshooting guide, which we’ve found through the development/conversion exercise to share with others. This is helpful especially when you think about scaling the development/conversion works so the more development work goes the more knowledge and experience you have as a whole team which can translate to reduce the delivery time and cost. So it’s something like ‘Center of Excellence’ as some people call it. But note that hosting such wiki site or ‘Center of Excellence’ will take a leadership effort and commitment, otherwise it will be forgotten after a few weeks, I’m sure you have seen this before! But when it works it really brings an amazing impact.

6. Project Management

Lastly it requires a sounds project management, but that is something that I don’t think I need to emphasize especially at here. Nothing is different, all the methodologies of project management will help to deliver the reports conversion project successfully as it does for any kind of projects.
Wednesday, August 26, 2009

Actuate to BI Publisher Reports Conversion for Siebel – Part 2

Yesterday, we were looking at how to convert Actuate reports to BI Publisher by using the Conversion Assistant tool. Now you got the Actuate reports converted to BI Publisher reports. The next step is how to enable the BI Publisher reports in Siebel application. I’m going to talk about the steps to upload and register the BI Publisher RTF Template files and associate them with relevant Siebel Views today.

Registering BI Publisher Report for Siebel

Once the RTF Template files are ready then you want to upload them to Siebel application and register them with appropriate Integration Objects.

Here is a list of the steps required to register the RTF Template files.

  1. Login to Siebel application
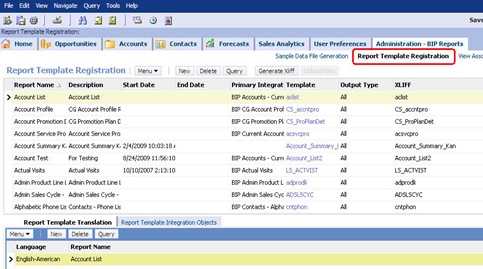
  2. In the Siebel application, navigate to the ‘Administration - BIP Reports’ screen, then ‘Report Template Registration’ view.

    Report_Template_Registration3
  3. In the ‘Report Template Registration’ view, click New.
  4. In the ‘Report Template Registration’ list, type a report name and optionally a description.
  5. Select the RTF Template file, and then fill in the rest of the fields.

    Filed

    Description

    Template

    The RTF report template

    Primary Integration Object

    The primary integration object for the report. The Primary Integration Object field is automatically populated when you select an integration object in the Report Template Integration Object list. This field is read-only in the Report Template Registration list.

    Output Type

    Format of the generated report. Choices are: PDF, HTML, RTF, EXCEL, PPT, or All.

    XLIFF

    XLIFF files contain the strings of the report column, field labels, and captions that are used for translation purposes.

    Start Date

    A start date for the report.

    End Date

    An end date for the report. After the end date passes, the report no longer appears in the Reports Menu.

    Once you fill in the above information now you need to associate a primary integration object for the report

  6. Select the Report Template Integration Objects view tab, and then click New.
  7. Fill in the fields in the new record.

    The fields are described in the following table.

    Field Description
    Integration Object Name Name of an integration object.
    Search Specification This is required only when you have multiple integration objects.
    Primary

    Indicates this integration object is the primary integration
    object.


  8. Perform one of the following:
    A: In connected mode, click Upload Files. (The report template (RTF) and XLIFF files are uploaded.)
    B: In disconnected mode, click Generate XLIFF. (The report template (RTF), XLIFF, and XSL files are uploaded.)

Associate Registered Report with Siebel Application View

After uploading and registering the RTF Template file, you need to associate the report with a Siebel application view so that the users can select the report from the context-sensitive Reports Menu on the associated view page.

Here is a list of the steps required to associate a registered report with a Siebel application view

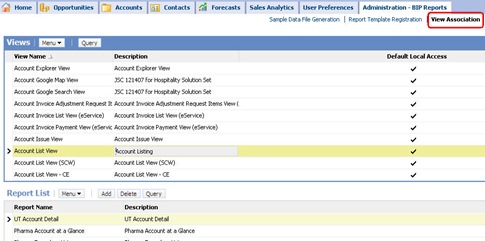
  1. Navigate to the ‘Administration - BIP Reports’ screen, then ‘View Association’ view

    Report_Association2
  2. In the Views list, select a view for which you want to associate a report
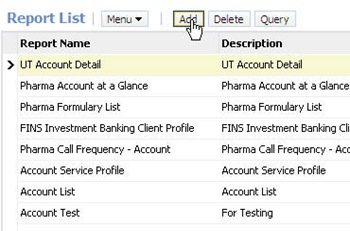
  3. In the Reports List view, click ‘Add’

    Report_List
  4. In the Views dialog box, choose a report name, and then click OK

The report is now available in the Reports Menu drop-down list when you are in the view you have just associated with. Now you want to test this newly added report to see if it works in the Siebel application.


Conclusion

Now you have seen how to convert Actuate reports to BI Publisher reports and deliver them in the Siebel application. You can use the Reports Conversion Assistant Utility to convert the Actuate reports to BI Publisher RTF Template, but there are many manual processes getting involved to complete the whole conversion as pretty much the case as any other type of conversion/migration exercise. I have already stated this at the ‘Oracle Reports Migration to BI Publisher in EBS’ post, but I can’t emphasize enough that it’s very critical to set clear objectives on ‘why we are converting all the reports?’ and ‘what values we are bringing into our business?’.  And based on the objectives we need to set a migration strategy and an appropriate project plan.

So I’d like to take a moment to talk about what are the keys to deliver the reports conversion projects successfully, regardless if it’s from Oracle Reports, Actuate, Crystal Reports, on tomorrow. So, stay tuned!

Monday, August 24, 2009

Actuate to BI Publisher Reports Conversion for Siebel – Part 1

Actuate to BI Publisher for Siebel

As you have seen in the previous posts the Siebel Reporting with BI Publisher architecture uses BI Publisher only for the reports layout generation, not for the data generation. It uses the Integration Objects, which are metadata objects in Siebel Business Applications that provide the ability to obtain Siebel data in XML format, within EAI Siebel Adapter to retrieve the data from the Siebel database. And this two layers of the report generation architecture is pretty much the same way as before with Actuate base reporting. Actuate has been used to handle the report layout with Actuate Design file (ROD) and generate report outputs based on data returned by the Integration Objects.

So the reports conversion will focus only for the layout part of the reports and that means you will take care of only the BI Publisher RTF Template side of business.

By converting the layout part of the report you can take advantage of BI Publisher’s easy and flexible development framework and better performance and scalability for the reports generation.

Conversion Process

Here is a list of steps required for the Actuate to BI Publisher reports conversion for Siebel.

  1. Obtain Actuate Report File
  2. Convert Actuate Report File to BI Publisher RTF Template File
  3. Review the converted file and Adjust/Update
  4. Upload the RTF Template and Register
  5. Associate the RTF Template with View

Reports Conversion Assistant Utility

When you start thinking about the conversion process, the first question would be if there is any conversion tool available or do we need to convert one report by one manually ? The answer is, Yes, there is a conversion tool available, which is called BI Publisher Actuate Reports Conversion Assistant. It converts the Actuate report files (BAS) to the BI Publisher RTF Template files.

How to Get the Conversion Assistant Utility?

You can get this tool from the metalink.

  1. Go to the metalink.
  2. Go to Patches & Downloads tab
  3. Click on the Oracle, Siebel and Hyperion Products link
  4. Click on Simple Search
  5. Enter patch number 8968224 in the Search by Patch Number/Name box
  6. Pick generic platform and click 'Go' (You should see files for download)

Before you start the conversion process make sure you have downloaded the above tool and locate to an appropriate folder.

How Much Can be Automatically Converted

The Conversion Assistant does the conversion for the basic objects but not for all. And often that you need to manually add or implement some of the functionality in the RTF Template files based on the original Actuate reports. This is due to different ways to achieve a same functionality between the two products (Actuate vs. BI Publisher).

You can find such objects that are not converted after the conversion by looking into the log file, which is also generated by the tool. The log file indicates the functions in the Actuate reports that are not converted with label names and you can find such label names in the generated RTF file with a tag like ‘<!--->’ as place holders.

Also, you want to review the report layout to see if the layout in the RTF template is matching the original report layout or newly defined reports layout requirements. In order to review the report layout you can preview the report with actual reporting data in a desired format such as PDF quite easily, instead of just looking at the RTF template, by using the BI Publisher MS Word Add-in tool called Template Builder.

How to Use the Conversion Assistant Tool?

The Actuate Reports Conversion Assistant is a Java command line tool and it requires JDK 1.5 or later. The conversion tool takes BAS file as an input therefore you need to generate the BAS file from the original ROD file first before you start the conversion. The below image illustrates the conversion workflow by the Conversion Assistant.

Conversison_Utility

The Conversion Assistant takes the following input parameters.

Parameter

Description

-i

Input file name – BAS file name

-o

Output file name – RTF Template fille name

-l

Log file name

And the syntax to convert a single report is:

run –i <bas filename> -o <output filename> -l <log filename>

You can also convert multiple files together and the syntax to convert multiple reports together is:

run –i <Folder_path_for_bas_files> -o <Folder_path_for_RTF_Files>

The above command will read all the files in the <Folder_path_for_bas_files> location and put the converted files with corresponding names in the <Folder_path_for_RTF_Files> location. By default a log file is created at location <Folder_path_for_RTF_Files>.

Review and Adjust Converted RTF Template

As mentioned above, the conversion assistant does the conversion from Actuate to BI Publisher RTF Template but in most cases it still requires manual adjustments. You can review the log file which indicates all the functions from the original Actuate report that are not converted. Also you can open the RTF Template file with the Template Builder (BI Publisher’s MS-Word Add-in tool), load the sample XML data file, and preview the report output to see if the final report output is meeting the business requirements. When you review the RTF Template file the followings are the typical items that requires such manual adjustments.

  • Layout
  • Formatting (Color, Number formatting, Date formatting, etc)
  • Calculation/Aggregation
  • Condition
  • Image (including company logo)

When you review the template files it is very important to compare with the newly defined requirements definition, which is agreed with business users who will consume the reports. There might be some logics or formatting in the report which are not relevant today’s business process. There might be some new requirements that are important today but not in the original report. Often that reports developers are given the original reports and they try to mimic the original reports for their adjustments and end up spending a lot of time for something that is not even required anymore. That’s why it is critical to have the requirement collection, analysis, and definition first even for this type of reports conversion project and make sure the all the developers who will work on the conversion process would crystal clearly understand the requirements and share how to address the gaps between the Actuate and BI Publisher.

How to Get XML Data File

One more thing for reviewing the report outputs to perform the manual adjustments. As mentioned above, you can use the Template Builder to preview the report outputs with sample data within MS-Word without connecting to the database or Siebel system. In order to preview the report outputs, you need to get a sample XML data file for each report first. You can generate the XML data file from the integration object for which you want to prepare a BI Publisher report. Here are the steps to obtain the XML data file.

  1. Login to Siebel application
  2. Navigate to the ‘Administration - BIP Reports’ screen, then ‘Sample Data File Generation’ view.
  3. In the Sample Data File Generation list, select the integration object for which you want to generate a data file, and then click Generate Data File.

An XML file will be generated with the name of the integration object followed by .xml. For example, if the integration object name is BIP Literature Fulfillment, the file name for the XML file is BIP Literature Fulfillment.xml.

Now you know how to convert the Actuate report files to BI Publisher RTF Template files. In order to generate Siebel reports with the converted BI Publisher RTF Template files you need to upload the RTF Template files and register them, and associate them with related Siebel Views so that the users can generate the reports from the relevant UI. I will talk about these process tomorrow, so stay tuned!

Friday, August 21, 2009

Running BI Publisher Reports in Siebel

After the previous post, now you know how BI Publisher is integrated within the Siebel architecture as the reporting platform. The next question would be, ‘how to run the BI Publisher reports in Siebel?’ and that is the question I’m going to address today. But it’s really a simple process to run the reports. Siebel application is all Web UI so you can login to Siebel application and navigate to a view (UI) where you want to generate a report for. Within a view you can click a ‘Reports’ icon which will show you a list of the reports accessible from the view.

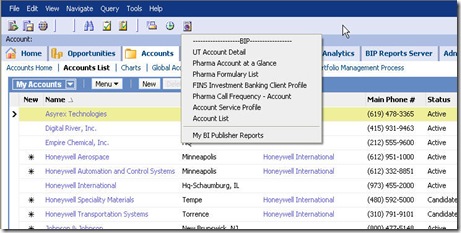
Siebel Reports Menu
Report_Menu

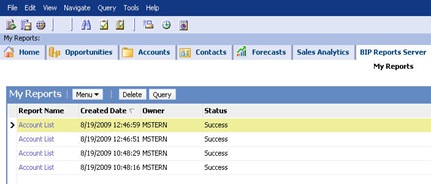
Under ‘BIP’ section you can view a list of the reports that are associated with the current view. You can click one of the listed reports to run the report. Or you can select ‘My BI Publisher Reports’ to see a list of previously run reports, which are saved on the Siebel server.

My Report List View
My_Report_List

Once you select one of the reports a dialog box will pop up where you can select the report output such as PDF, HTML, etc.

Report_Output_Selection

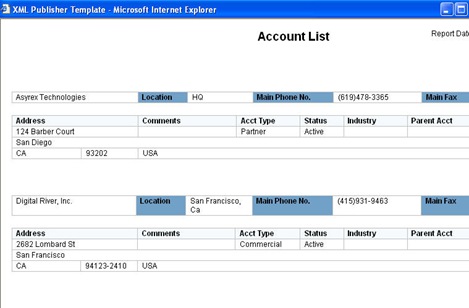
You can select one of the report output format type and it will generate a report in the specified format and display.

Report_Output

And here is a reporting work flow diagram.

image

Well, it’s that simple. But the key is that you can access to only the reports that have been associated with the view you are current at. So somebody has to set that up for you before you start running the reports. And that is something that I will talk about as part of the ‘Actuate to BI Publisher Reports Conversion’ topic, which will follow tomorrow, so stay tuned!

Thursday, August 20, 2009

Siebel Reporting Architecture with BI Publisher

BI Publisher is the Reporting Platform for Siebel

BI Publisher has been introduced to Siebel users since its Release 8.1.1 as a new reporting platform replacing the older Actuate base reporting platform. It is tightly integrated with the Siebel architecture and its applications. The users can run and manage their reports with BI Publisher from Siebel applications UI.

The BI Publisher integration patch for older releases like 7.7, 7.8, 8.0 are currently planned. The detail can be found from a metalink note.

So now you can use BI Publisher to start developing new reports and taking advantage of the a lot of benefits that BI Publisher offers. But how should we do with the existing reports that have been developed with the older Actuate base platform?

That is the question I’d like to address by discussing how to convert the existing Actuate base reports to BI Publisher base reports in Siebel applications. But, before I start talking about the reports conversion, let’s take a look at how the new Siebel reporting works with BI Publisher first.

Two Different Modes for BI Publisher Integration

There are two different ways of integrating BI Publisher as Siebel reporting platform. One is for Connected mode (Siebel Web UI) and another is for Disconnected mode (Siebel Mobile client and Developer web client). This is only a difference in terms of the way BI Publisher is integrated technically and how the reports are generated inside the Siebel application. So from the end user point of view there is no difference when they request to run the reports.

The Connected mode utilizes BI Publisher Server while the Disconnected mode uses internally embedded version of BI Publisher reporting engine, which is a set of Java libraries. I will describe the two different Siebel Reports Architectures and Reporting flow below.

Siebel Reports Architecture and Report Flow Generation for Connected Mode

The Siebel Web Client allows you to run reports in connected mode. When you try to run the reports, the related Integration Objects, which provide the ability to obtain Siebel data in XML format, extracts the relevant data from the Siebel database. A Siebel reporting server (XMLP Report Server Component) issues an outbound Web service call and pass the XML data to a standalone BI Publisher Server. The BI Publisher Server accepts the XML data file, convert a registered RTF Template to XSL-FO template, marry the XML data with the template, and generate a final report output such as PDF. The BI Publisher Server then sends the report output file back to the XMLP Report Server Component using an outbound Web service call. The report is stored in the Siebel File System and then displayed in the Siebel UI.

Siebel Reports Architecture Diagram for Connected Mode

Here is the Siebel Reports Architecture diagram.

image


  1. A report generation event is triggered from a view in the Siebel user interface
  2. The Siebel Application Object Manager (AOM) routes the event to Siebel database
  3. The Server Request Broker (SRBroker) and the Server Request Processor (SRProc) monitor the request and pass it to the XMLP Report Server Component through the Report Driver Service
  4. The XMLP Driver Service makes a call to the XMLP Data Service
  5. The data service requests data to the EAI Siebel Adapter
  6. The EAI Siebel Adapter fetches data from the database
  7. The EAI Siebel Adapter returns the data
  8. The XMLP Data Service returns control back to XMLP Driver Service through the data service
  9. The XMLP Driver Service again makes a call to the XMLP Adapter Service
  10. The XMLP Adapter makes a proxy business service
  11. The Proxy Business service makes a Web service call to the BI Publisher Server to execute the report
  12. The BI Publisher Server executes report generation, returns back generated report binary data
  13. The control comes back to the XMLP Adapter Service
  14. The XMLP Adapter Service then downloads the report and creates the file in the Siebel File System
  15. And it displays the report in the UI


Siebel Reports Architecture and Report Flow Generation for Disconnected Mode

The mobile clients—Siebel Mobile Web Client and Siebel Developer Web Client, allow you to run Siebel Reports interactively in disconnected mode.
In disconnected mode, the BI Publisher Server is a logical component that uses the BI Publisher XDO Engine to manage report generation. The XMLP Report Business Service is the interface to this logical component that instantiates the EAI Java Business Service to load the JAR files to the JVM (Java Virtual Machine). The BI Publisher XDO Engine then processes the XML data, XSL template, and XLIFF files to output the report.

So again, even with this mode BI Publisher is used only to generate the final report output, not for the data generation part. The reporting data is generated by the Integration Object and the XML data and the relevant RTF Template file are passed to the BI Publisher XDO engine, which will generate a final report output.

Siebel Reports Architecture Diagram for Disconnected Mode

Here is the architecture diagram for Disconnected mode

image

  1. A report generation event is triggered from a view in the Siebel application.
  2. Data is fetched from the database by the EAI Siebel Adapter and stored as XML in the XMLP\DATA folder in the Siebel installation directory.
  3. A call is routed to the XMLP Report Java Business Service.
  4. The XMLP Report Business Service instantiates the EAI Java Business Service, and loads the JAR files to the JVM (Java Virtual Machine).
  5. The BI Publisher XDO Engine loads the XDO classes from the JAR files, and then the XML, XLIFF, and XSL template are given as input to the XDO classes for generating the report. The report is
    temporarily stored in XMLP\REPORTS, and then sent to the Siebel File System.
  6. The control then goes back to the Siebel user interface where the generated report appears.

So this is how Siebel has integrated BI Publisher for each mode (Connected vs. Disconnected) and how the reports are generated within the integration from a technical perspective. Next, I will talk about how to run the BI Publisher reports within Siebel. Stay tuned!

Wednesday, August 19, 2009

Oracle Consulting Service - Oracle Reports to BI Publisher Migration (Conversion)

Before going to the ‘Actuate to BI Publisher Conversion’ topic, I would like to introduce our consulting services prepared specifically to the ‘Oracle Reports to BI Publisher Migration (Conversion)’.

There are two types of the services. One is, ‘Complete Migration Service’, which is to provide a service to convert the entire existing Oracle Reports base reports to BI Publisher base reports. With this service we will provide a full conversion service to enable organizations to reduce administrative, maintenance, and development cost, and to empower business users with the benefit of the new reporting architecture by delivering a complete reports migration available in the EBS instance with our best practice approach and reports migration methodology we have developed in Oracle consulting. This service will provide a full reports migration/development life cycle starting from developing project objectives/project plan and ending with end users training/documentation/production support.

Another is, ‘Reports Migration Accelerator for EBS’, which is to assist organizations to understand the migration process and set up an optimized plan to execute with enough skill sets by reviewing the existing reports and the business/technical requirements and providing hands-on base training with a selected number of actual reports within the organization’s instance.

And of course these are packaged services but can be customizable to suite to each organization’s requirements.

Here are the data sheets for the both services, please download if you would be interested in, and feel free to contact me at Kanichiro.Nishida@oracle.com

Ok, that’s it for the advertisement! And I will start Actuate to BI Publisher reports conversion from tomorrow, so stay tuned!

Tuesday, August 18, 2009

Oracle Reports Migration to BI Publisher in EBS – Part 3

Register BI Publisher Report Template to EBS

After you have completed converting the Oracle Reports RDF file to BI Publisher Data Template and RTF Template with the conversion tool, the next step is to register such template files. You can do so by logging into the EBS web UI with BI Publisher Administrator responsibility and register them. After the registration you need to update the existing concurrent program to use the new Data Template file.

Register Data Template as Data Definition in Template Manager

First, you need to register your Data Template.

  1. Login to EBS
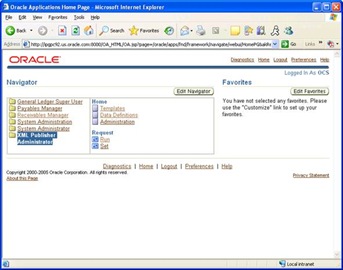
  2. Choose XML Publisher Administrator responsibility
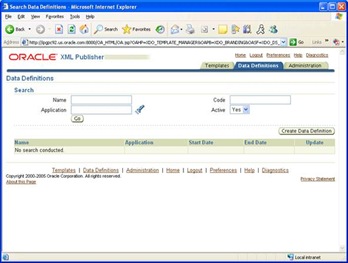
  3. Click Data Definition in the left box
    clip_image002
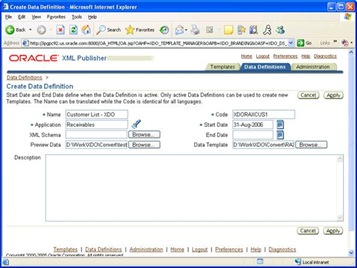
  4. Click ‘Create Data Definition’ button to create a new Data Definition
    clip_image004
  5. Input Data Definition Name
  6. Input Code
  7. Choose Application. (e.g. Receivables)
  8. Input Start Date
  9. Specify the XML data file as Preview Data. (Optional)
  10. Specify your Data Template file as Data Template
  11. Click Apply to save
    clip_image006

Register RTF Template as Template in Template Manager

Once your Data Template has been registered now you can register your RTF Template.

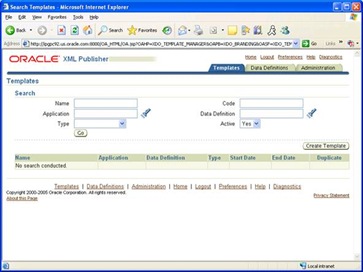
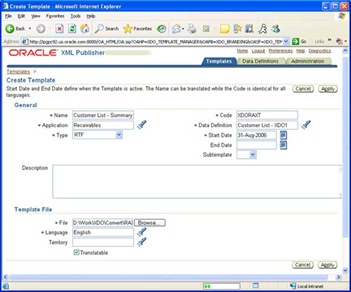
  1. Click Templates tab
  2. Click ‘Create Template’ button to create a new Template
    clip_image008
  3. Input Template Name
  4. Input Template Code name
  5. Choose Application (e.g. Receivables)
  6. Choose Data Definition
    You need to choose the Data Definition that you have created at the previous process step.
  7. Choose Template Type, in this case it’s ‘RTF’
  8. Specify Start Date
  9. Specify RTF Template file that you have developed
  10. Choose English as Language
  11. Check ‘Translatable’ checkbox
  12. Click ‘Apply’ button to save
    clip_image010

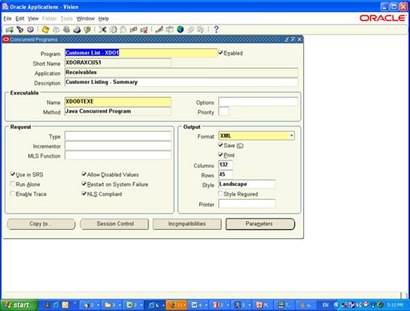
Create a new Concurrent Program with Data Engine

Once you have completed the registration of both Data Template and RTF Template then you want to create a new concurrent program based on the original concurrent program, which is associated with the Oracle Reports base report, and associate it with the templates.

  1. Choose System Administrator responsibility
  2. Go to Concurrent/Program/Define
  3. Select the original Reports Concurrent program
  4. Click ‘Copy to’ to copy the original concurrent program

In a popup window,

  1. Type Program name
  2. Type Short Name (This must be identical to the Data Definition Code that you have registered in Template Manager.)
  3. Choose Application, e.g. Receivable (AR)
  4. Check both ‘include Incompatible Program’ and ‘include Parameters’
  5. Choose ‘XDODTEXE’ as Executable
    This is XML Publisher Data Engine Java Concurrent program that takes Data Template and extract data based on the template information and generate XML file
  6. Choose XML as Output Format
  7. Save
    clip_image012

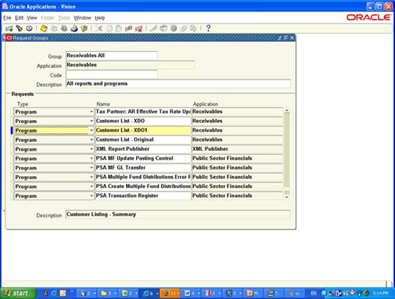
Assign the new Concurrent Program to a Request Group

Now you need to assign the newly created concurrent program to a request group that your users have access to, otherwise the users can not find the new concurrent program to run.

  1. Go to Security/Responsibility/Request
  2. Select a Request Group which is assigned to your responsibility that you want to run the request with. (e.g. Receivables All for Receivables Manager)
  3. Add the new Concurrent Request program and Save
  4. Make sure the users’ responsibility has the Request Group
    clip_image014

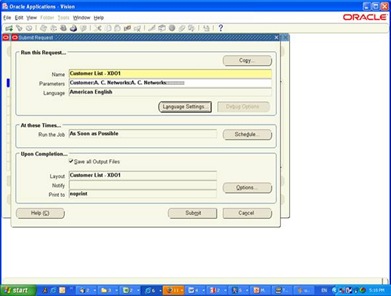
Run the Report Request

Now you want to test this report to see all the registration and configuration at the previous steps have been done appropriately.

  1. Go to Submit Request Window or select View/Request from the tool bar menu
  2. Choose the new Concurrent Request program
  3. Select parameter values if any.
  4. You should see the RTF Template you have registered in the Template Manager.
    clip_image016
  5. Click Submit

Once the request is run with complete status successfully now you should be able to open the PDF report by clicking ‘View Output’. If the request has completed with an error click ‘View Log’ to find the detail problem.

Conclusion

After the ‘Oracle Reports Migration to BI Publisher in EBS Part 1, 2, and 3’, now you have 1) converted the original Oracle Reports base report to BI Publisher base report which consists of Data Template and RTF Template, 2) registered the converted template files with EBS, 3) created a new concurrent program by copying the original and associate it with the templates 4) validated the converted report.

This is a normal process of the reports conversion from Oracle Reports to BI Publisher for EBS. Of course, as discussed at the beginning, you can convert only the layout part of the report and keep using Oracle Reports as a data generation engine. In this case you need to register only the RTF Template and associate it with the original concurrent program through Data Definition.

Again, the most critical thing is not just the technical side of the conversion process, it’s more the business side. While administration and maintenance cost in IT departments will be reduced by converting to BI Publisher reporting architecture it’s important to note that there can be a huge value at the business side who will be the users and could see a lot of potential values with this new reporting architecture and this reports conversion initiative itself.

For example, by moving to BI Publisher reporting architecture now the users can use MS-Word to design the reports by themselves. With RTF Template the users can have images, charts, table of contents, URL hyper link, etc in their reports easily. Separation of the layout design piece from the data definition enables the users to make changes on the layout easier with less risk. BI Publisher’s reporting engine has better performance and scalability than Oracle Reports.

So not only delivering the x number of the reports being converted on time, but also it’s important to discuss how to meet the business requirements in today’s business condition and how the new reporting architecture can improve their business and set clear objectives to be shared through the conversion project phases. And such objectives should drive on what conversion option to be chosen and how to set the conversion plan and execute.

So that’s it for the reports migration (conversion) for EBS. I will start another reports conversion topic, ‘Actuate to BI Publisher conversion for Siebel’ from tomorrow, so stay tuned!