Tuesday, April 28, 2009

JNDI Connection for WebLogic Server

I have already talked about how to create the JNDI data source for OC4J and how to use it in BI Publisher. The same configuration for the OC4J can be also applied to Oracle Application Server. But how about Oracle WebLogic Server?

Today I’ll talk about how to create a database connection pool and register with JNDI on WebLogic Server.

JDBC Data Source with JNDI Creation on WebLogic Server

Here is a list of steps to create the JDBC/JNDI data source.

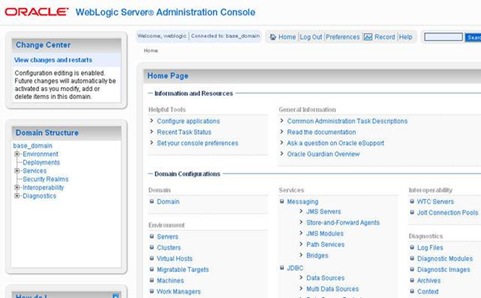
1. Login to WebLogic Server Administrative Console

clip_image002

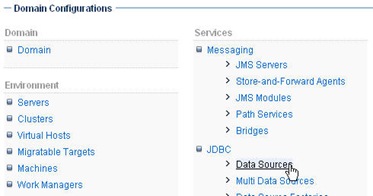
2. Click ‘JDBC’ link within ‘Domain Configuration’ section

clip_image003

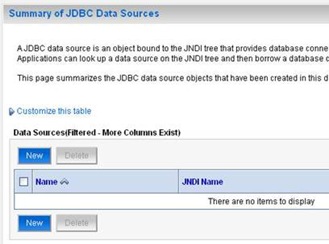
3. Click ‘New’ button

clip_image005

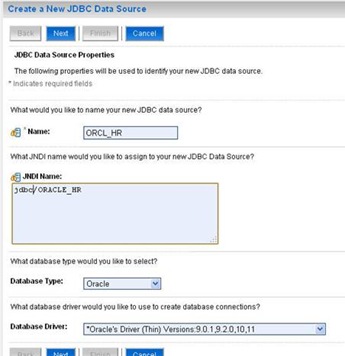
4. Type the data source name

5. Type JNDI Name

6. Select Database type

7. Select Database Driver

clip_image007

8. Click ‘Next’ button

9. Leave all the parameters as they are and click ‘Next’ button

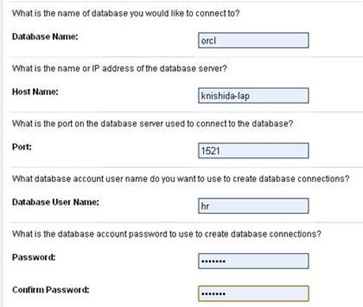
10. Type Database Name (SID)

11. Type Database Hostname

12. Type Database Port

13. Type Database Username/Password

clip_image009

14. Click ‘Next’ button

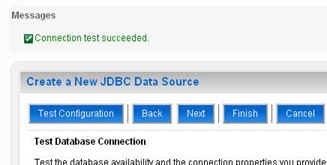
15. Click ‘Test Configuration’ button to test the database connection

16. Note: Make sure you get ‘Connection test succeeded’ message.

clip_image010

17. Click ‘Next’ button

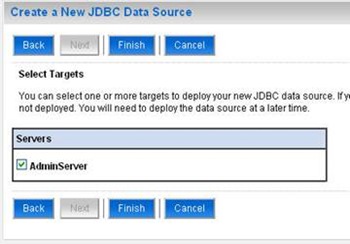
18. Select ‘AdminServer’ checkbox and click ‘Finish’ button

clip_image012

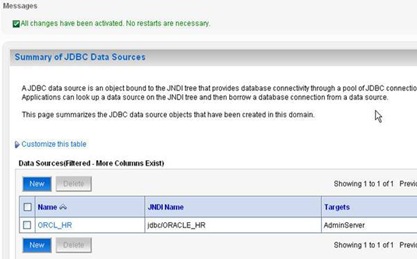
Once you get a message below your JNDI data source is now created at the WebLogic server.

clip_image014

At this point you should have a working JNDI data source on the WebLogic server so you can register it in BI Publisher as shown in the yesterday’s post, Register JNDI Connection in BI Publisher, and start using it!

Monday, April 27, 2009

Register JNDI Connection in BI Publisher

So yesterday you created a JDBC connection pool and register it with JNDI at the OC4J server. Today I’ll go through how to register the JNDI data source so that you can use that as a data source for your reports.

Once you register the JNDI data source it’s exactly the same in terms of how to use it when you develop your reports. In fact, the reports developer wouldn’t even recognize the difference when they choose the data source from the data source list drop down list.

Register JNDI Connection from Admin Window

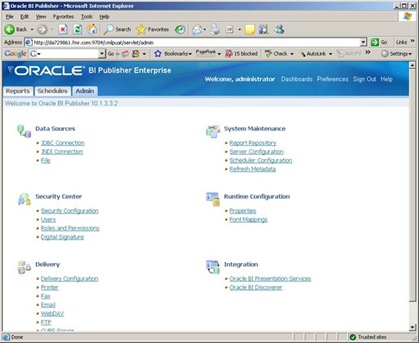
  1. Login to BI Publisher Enterprise Server and go to Admin page
    clip_image002
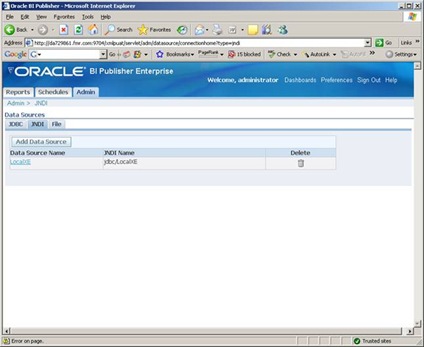
  2. Click on the ‘JNDI Connection’ link
  3. Click on the ‘Add Data Source’
    clip_image004
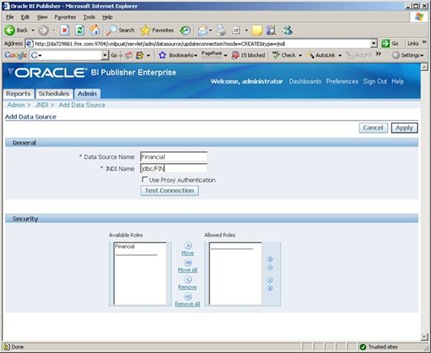
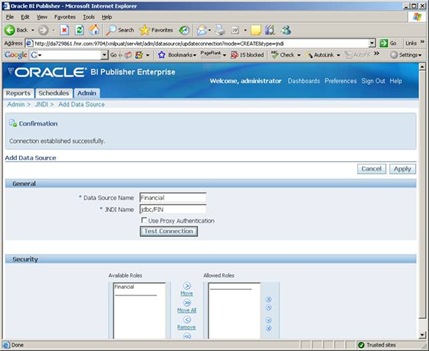
  4. Type Data Source Name (e.g. Financial)
  5. Type JNDI Name. This must be the same name as the JNDI name you created at your J2EE Server such as OC4J, WebLogic server, etc. 
    clip_image006
  6. Click on the ‘Test Connection’ button to test if the JNDI connection works.
    clip_image008
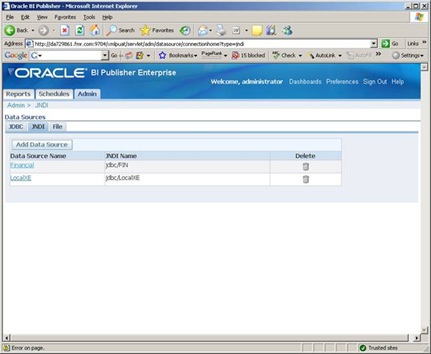
    Once you get the success message then click on the ‘Apply’ button to save.
    clip_image010

Now you can select the JNDI data source for your reports!

Tomorrow, I’ll talk about how to create the JDBC connection pool and register as JNDI for Oracle WebLogic Server, so stay tuned!

Friday, April 24, 2009

JNDI Connection for OC4J

Today I’m going to go through on how to create the Database Connection Pool and JNDI on OC4J. If you’re not sure about the Database Connection Pool and JNDI please check the previous post.

I’ll use Oracle database as a data source and Oracle Enterprise Manager (EM) that comes with OC4J as a tool to create the Database Connection Pool and JNDI.

Access to Enterprise Manager (EM)

First you need to create a Connection Pool and then you can create a JNDI Data Source mapping to the Connection Pool. You can do such by using the EM so first let’s login to the EM. Here is the URL for the EM for the OC4J.

http://hostname:port/em

If you installed OC4J as part of your BI EE or BI Publisher installation then the port number is the same for your BI Publisher application, such as ‘9704’.

e.g. http://knishida-pc:9704/em

Once you have logged in to your EM you should see the window like the below.

Login to Oracle Enterprise Manager (OC4J Admin Console)
clip_image002[6]

Create Database Connection Pool

Now let’s create a Database Connection Pool. You need a JDBC connection information for your database for this task.

1. Click on the ‘Administration’ tab

clip_image004

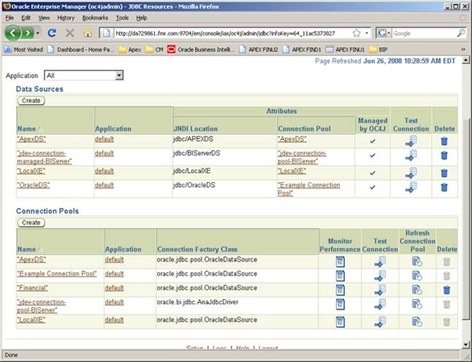
2. Click ‘Go To Task’ link of ‘JDBC Resources’

clip_image006

3. Click ‘Create’ under Connection Pool

clip_image008

4. Click on the ‘Continue’ button (Leave all the fields as default)

clip_image010

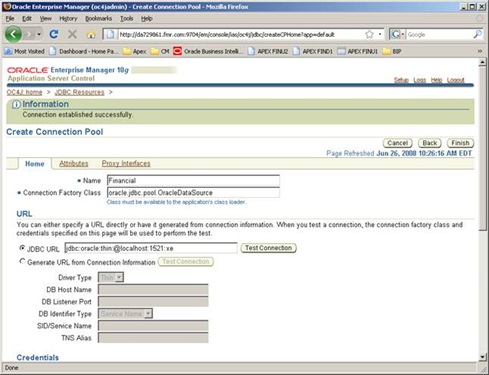
5. Enter the following information

Name

Financial

Connection Factory Class

oracle.jdbc.pool.OracleDataSource

JDBC URL

jdbc:oracle:thin:@<hostname>:<port_number>:<sid>

Username

<database_schema_name>

Use Cleartext Password

Check

Password

<Password for the database_schema)

6. Click 'Test Connection' button, which is located under URL section

clip_image012

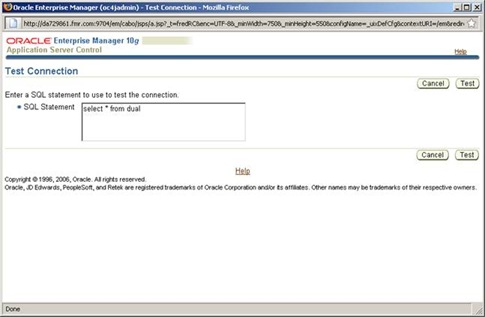
7. Click ‘Test’ button

clip_image014

If you get an error message make sure all the values entered at the above steps are correct.

8. Click on the ‘Finish’ button

Now you have created one Database Connection Pool at your OC4J server. Now you need to register it with JNDI.

Create Data Source (Register with JNDI)

Now you are going to create a ‘Data Source’, which is basically that you’re registering the previously created Database Connection Pool with JNDI so that you can access to the connection pool through the JNDI. This example will create a Financial JNDI data source.

1. Click on the ‘Create’ button under Data Sources

clip_image016

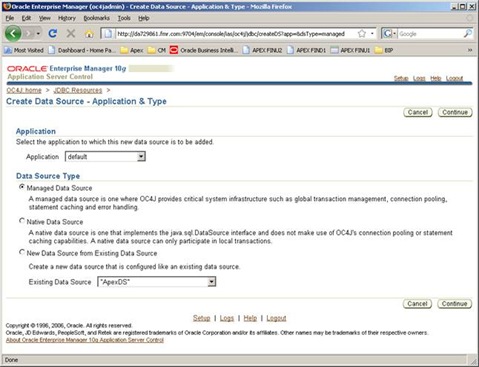
2. Click on the ‘Continue’ button (Leave all the fields as default)

clip_image018

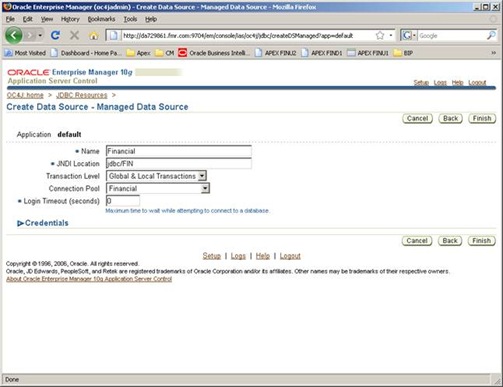
3. Enter the following information

Name

Financial

Connection Factory Class

jdbc/FIN

Transaction Level

Leave as default

Connection Pool

Financial

clip_image020

You can enter any name for the JNDI location, but this will later be referenced as a JNDI data source so you want to a standard naming rule such as jdbc/<database_name> or something like that.

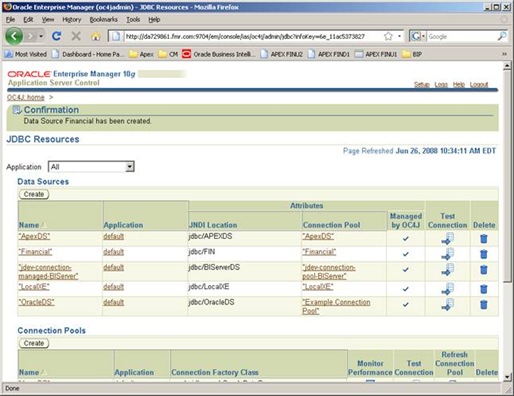
4. Click ‘Finish’ button

clip_image022

You can click the ‘Test Connection’ icon for the Data Source you have just created to make sure that it works. If it works fine that means now you have created one JNDI connection for your database!

I’ll talk about how to register the JNDI connection in BI Publisher tomorrow, so stay tuned!

Thursday, April 23, 2009

JNDI Data Source?

You may have seen the JNDI data source menu at the BI Publisher Admin page and have wondered what and when to use it.

What is JNDI?

So what is JNDI? JNDI stands for Java Naming and Directory Interface. Here is an excerpt from ‘Oracle Containers for J2EE Services Guide’.

---

“JNDI provides naming and directory functionality for J2EE applications and components. JNDI is defined independently of any specific naming or directory service implementation. This enables J2EE applications and components to access different naming and directory services using a single API. Different naming and directory service provider interfaces (SPIs) can be plugged in behind this common API to handle different naming services.

A J2EE-compatible application uses JNDI to obtain naming contexts. A naming context enables the application to retrieve J2EE resources including data sources, local and remote Enterprise Java Beans (EJBs), and JMS-administered objects such as topics and queues.”

---

So it’s basically a naming registry that you can find the resource that you’re looking for by using a common name among applications deployed on a same J2EE Web Application server. So once you have registered a JDBC data source at your J2EE Web Application server then you can use the same data source among the applications on the server while if you register the JDBC in one application then another application can not use it.

JDBC Connection Pool?

What makes this JNDI even more valuable for BI Publisher is you can use a JDBC connection pool through the JNDI. The JDBC Connection pool maintains a cache of physical database connections that can be reused. So even after the first client request closed a database connection the database connection itself still remains at the server. When the second client request comes in then it will use the same connection that was used for the previous client session. This is a connection pool so multiple clients can use the same connection to access to the same database. A connection pool improves performance and scalability by allowing multiple clients to share a small number of physical connections.

Typically you register a JDBC connection pool at a J2EE Web Application server then all the applications running on the server share the same JDBC connection pool through the JNDI.

Why JNDI Data Source?

There are some advantages of using the JNDI data source over the JDBC data source for the BI Publisher reporting.

First, it is a connection pool, so each client request to the database can share the JDBC connection instead of opening each of the connection. When you have multiple SQL base list of values for your report BI Publisher opens the database connection of each of the list of values so you end up opening many database connections for just one single report. Yes, this obviously will have an impact on your report performance and the server resource. If you have one JDBC connection pool and use it through the JNDI then the report doesn’t need to open the extra connection. I’ve seen this at several clients who had many parameters for one report and it made a good performance improvement after we switched to the JNDI data source.

Second, some times the DBA might not want to share the database schema name and password with the BI Publisher administrators. If the DBA also manages BI Publisher this is not a problem. But if not then this becomes to be a problem especially for a production environment. JNDI data source stores the schema name and password at the web application server level, not the application level.

Third, when you do a BI Publisher repository migration between environments such as Development, Testing, Production, you need to change the password for each environment after the migration because usually the password for the schema is different between the databases. By using this JNDI you don’t need to worry about this at least at the application level, in this case it’s BI Publisher.

So I’ll cover how to create the JNDI data source for BI Publisher with examples of Oracle OC4J and Oracle WebLogic servers from tomorrow, so stay tuned!

Friday, April 10, 2009

Deployment for Another OC4J Container

Interestingly enough, I have received a couple of queries in the last few weeks on whether we can deploy BI Publisher Enterprise server in another OC4J container other than the default ‘home’. If you are using Oracle Application Server you can create multiple OCJ4 instances and manage them separately. So the question would be ‘How to deploy to another OC4J container and what are the extra steps?’

You can of course deploy BI Publisher server into any other OC4J container than the default ‘home’. The deployment process would be exactly the same as you do for the default one. However, there is one step we need to do as extra, which is to avoid some Java classes confliction.

Today, I’ll cover the steps to deploy BI Publisher into another OC4J instance starting from creating the OC4J instance based on the document that one of our Oracle BI Publisher consultant, Shankar Duvvuri, put together.

Create Another OC4J Instance

After you login to the Application Server you can click on the Application Server link.

Snap3

Click the ‘Create OC4J Instance’ button.

Snap4

Enter the OC4J Instance Name (Example: BIP_TEST)

Snap5

You can check “Start this OC4J instance after creation” so that the instance will start after the creation.

Click on “Create” button

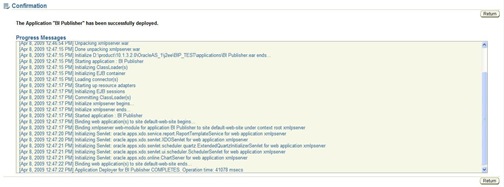
After successful creation the following confirmation page would be shown and the OC4J instance would start automatically

Snap6


Now we have created a new OC4J instance. Next, we can deploy the BI Publisher Enterprise server application. This will be pretty much the same process as the one for OC4J, which is already covered before, except for one step where we need to deselect a library to avoid unnecessary conflict. 

Deploy to the OC4J Instance

When you click the newly created OC4J instance link you should swee the page similar to the following.

Snap7

Click on Applications tab and click the ‘Deploy’ button.

Now you need to enter the xmlpserver.ear location path. (example: D:\BI_Media\Windows\Server_Ancillary\Oracle_Business_Intelligence_Publisher\oc4j) Note that you need to make sure you are picking the right ear file. For Oracle Application Server deployment you need the one under ‘oc4j’ folder in the installation media.

Snap8

Click on ‘Next’ button

Enter Application Name (for example BI Publisher) and then click on the ‘Next’ button

Snap9

In this page, you can deselect a Java class library. Click on the pencil icon for ‘Click on Configure Classloading’.

Snap10

And uncheck the Import check box for apache.commons.logging and click on OK.

Snap11

This would bring back to the Deployment Settings screen. Click on Deploy. Once the deployment is successful, the confirmation page is shown.

Snap12

Configure BI Publisher Repository Path

As we did for OC4J and WebLogic server deployment we need to configure the BI Publisher repository manually after the deployment. Find ‘xmlp-server-config.xml’ configuration file under your newly deployed application. It should be something like this.

e.g. D:\product\10.1.3.2.0\OracleAS_1\j2ee\BIP_TEST\applications\BI Publisher\xmlpserver\WEB-INF

And modify the file path to suite to your BI Publisher repository location. For example, it would be something like below

<file path="C:\OracleBI\xmlp\XMLP"/>

where ‘C:\OracleBI\xmlp\XMLP’ is where the BI Publisher repository is located.

Once you have made the modification, restart the OC4J (BIP_TEST). And now you’re ready to access to the newly deployed BI Publisher Enterprise Server instance!

Wednesday, April 1, 2009

Installation for Oracle WebLogic Server

If you need to install BI Publisher to other than the default embedded version of OC4J server then the installation process is always manual steps. No installer. You can go through the BI Publisher Installation guide for the detail. But today, I’ll cover the BI Publisher installation for Oracle WebLogic Server. I use WebLogic Server 10GR3 (10.3) version as example.

BI Publisher Installation with WebLogic Server

I have already installed WebLogic Server 10GR3 version and created a domain where I’m going to install BI Publisher Enterprise Server. So I’m going to cover the steps from this point. If you’re interested in how to install and create the domain please take a look at the WebLogic Server’s installation guide.

The installation process consists of the following main steps:

  • Unarchive BI Publisher Application file (WAR)
  • Configure BI Publisher Repository
  • Deploy BI Publisher Application
  • Validate the Deployment

Unarchive BI Publisher Application File

1. Create a staging folder

First we need to create a staging folder where we’ll unarchive the BI Publisher application file (xmlpserver.war) and locate the BI Publisher Repository.

e.g. D:\bea\BIP

2. Locate xmlpserver.war file to the staging folder

Note that you need to get the xmlpserver.war file from non-oc4j folder.

3. Move to the staging folder

4. Unjar the xmlpserver.war file by using jar utility with ‘xvf’ option.

e.g. D:\bea\BIP>jar xvf xmlpserver.war

5. Delete the xmlpserver.war file from the staging folder

6. Create a new folder called, ‘xmlpserver.war’

7. Move all the unjar-ed files to this new folder.

It should be something like this.
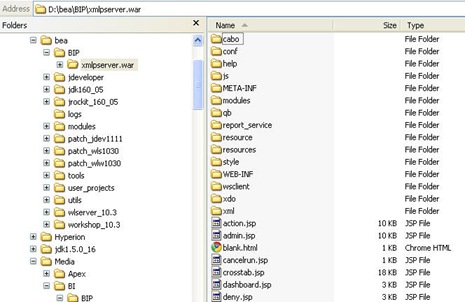
unjarred_war

Configure BI Publisher Repository

BI Publisher Repository is where all the BI Publisher reports are stored and all the BI Publisher server configuration settings are also stored. You can find the default BI Publisher Repository under the installation media. For example, I have deployed Oracle BI EE R10.1.3.4 suite installation media under ‘D:\Media\BI’ folder so the BI Publisher Repository can be found at:

D:\Media\BI\Windows\Server_Ancillary\Oracle_Business_Intelligence_Publisher\XMLP

1. Copy the BI Publisher Repository (entire ‘XMLP’ folder) to the staging folder.

At this point my staging folder looks like this. (My example renamed the folder name to be ‘XMLP_WL’ but this is not necessary.)
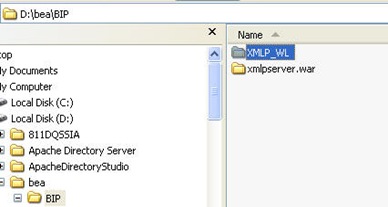
staging_folder

Now we need to register the BI Publisher Repository path in one of the BI Publisher configuration file before starting the deployment. And this is the reason why we had to unarchive the xmlpserver.war file before the deployment.

2. Open xmlp-server-config.xml file. This file can be found under WEB-INF folder.

e.g. D:\bea\BIP\xmlpserver.war\WEB-INF

3. Change the BI Publisher Repository path that is set in ‘file path’ in the file.

Before

<?xml version="1.0" encoding="UTF-8"?>
<xmlpConfig xmlns="http://xmlns.oracle.com/oxp/xmlp">
  <resource>
    <file path="${oracle.home}/xdo/repository"/>
  </resource>
</xmlpConfig>

After (Example)

<?xml version="1.0" encoding="UTF-8"?>
<xmlpConfig xmlns="http://xmlns.oracle.com/oxp/xmlp">
  <resource>
    <file path="D:\bea\BIP\XMLP_WL"/>
  </resource>
</xmlpConfig>

Deploy BI Publisher with WebLogic server

1. Start WebLogic Server Administration Console
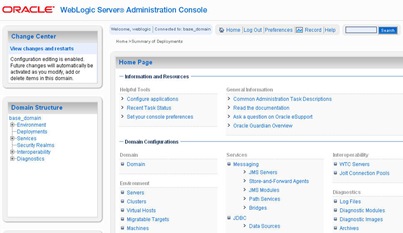
Admin_Console

2. Click ‘Deployment’ menu in left hand side ‘Domain Structure’ box.
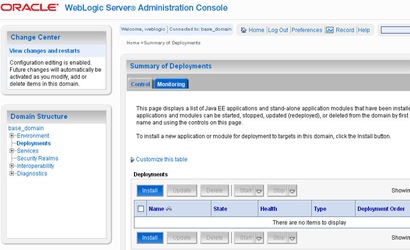
Admin_Console_Deployment

3. Click ‘Install’ button

4. Select the staging folder for the ‘current location’

5. Select ‘xmlpserver.war’ , which is the one that has just been created in the previous step.
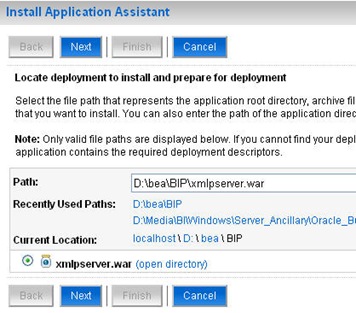
deployment1

6. Click ‘Next’ button

7. Select ‘Install this deployment as an application’ and click ‘Next’ button.
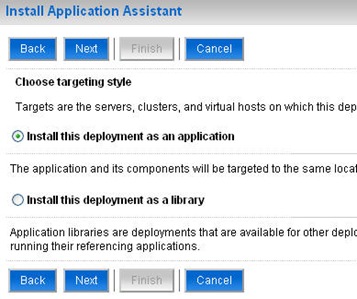
deployment2

You can change the context name if needed. In this example I’ll keep it as it is, which is ‘xmlpserver’. You can leave the others as default.

8. Click ‘Next’ button.
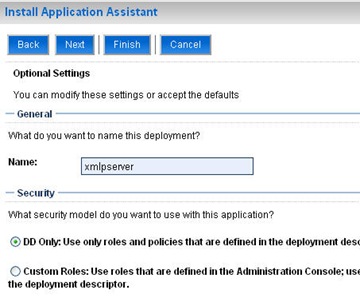
deployment3

9. Click ‘Finish’ to start the deployment.

Once the deployment process is completed, go to ‘Deployment’ page by clicking ‘Deployment’ menu in the left hand side ‘Domain Structure’ box, and make sure that ‘Health’ column for the ‘xmlpserver’ shows ‘OK’ status. If you see ‘Failed’ then you need to click the link to see the detail error and fix it.

deployment_ok

UPDATE:

You need to update the weblogic server startup script in order to configure the BI Publisher scheduler setting appropriately. Here is how from the release note.

---------------------------------------------------------------------------------

If you are deploying BI Publisher to WebLogic Server 10.3.1, you must add the following setting at startup for the domain that contains the BI Publisher server in the /weblogic_home/user_projects/domains/base_domain/bin/startWebLogic.sh script :

-Dtoplink.xml.platform=oracle.toplink.platform.xml.jaxp.JAXPPlatform

This setting is required to enable BI Publisher to find the TopLink JAR files to create the Scheduler tables.

---------------------------------------------------------------------------------

Note that, the class name should be JAXPPlatform, not JAXXPlatform. An older version of the release note has this wrong, so make sure.

Validate the Deployment

You can validate the deployment by logging into BI Publisher Enterprise Server and run one sample report.

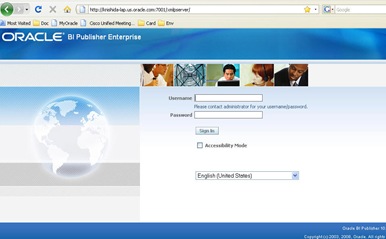
1. Go to BI Publisher login window.

You can type an URL something like below to your browser to open the login window.

http://hostname:port/xmlpserver (e.g. http://knishida-lap.us.oracle.com:7001/xmlpserver)
login_window

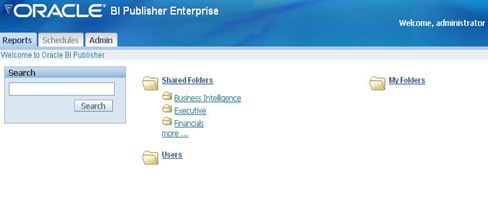
2. Type username and password. The default username and password are ‘Administrator/Administrator’

If you have successfully logged in and see the page like the below then your deployment is successful.
default_page

However, I’d recommend you hold on to cheer the ‘success’ with proseco until you run at least one report. Fortunately there is a set of sample reports in the BI Publisher Repository that can run without database access. But you need to do one simple configuration to enable the reports.

3. Go to ‘Admin’ tab and click ‘File’ link under ‘Data Sources’ menu

data_source

4. Click ‘demo files’

data_source2

5. Modify the Directory path

This ‘DemoFiles’ folder is actually located under the BI Publisher Repository. So modify the file path according to your repository location.

My BI Publisher Repository is located at ‘D:\bea\BIP\XMLP_WL’ so it should be something like, ‘D:\bea\BIP\XMLP_WL\DemoFiles’

data_source3

6. Click ‘Apply’ button to save the change.

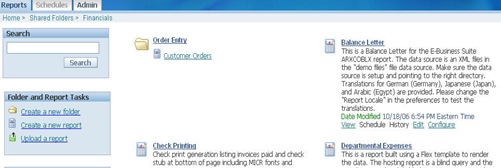
7. Go back to ‘Reports’ tab and go to ‘Shared Folder’ –> ‘Financials’
babalance_letter_menu

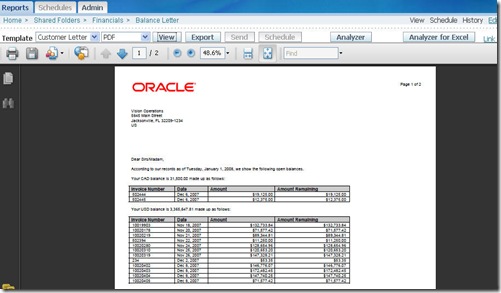
8. Click ‘Balance Letter’ to view the report

Once you get the report output then now your BI Publisher deployment on WebLogic server is working! Now you can go outside and cheer with whatever you like!
babalance_letter

By Kanichiro Nishida, Technical Manager, Oracle EPM&BI Consulting