Tuesday, July 5, 2011

Chart with BI Publisher 11g Layout Editor

image

Chart is one of the best and most effective ways to provide your audience a great insight about the data. Creating charts with BI Publisher 11g Layout Editor has made the chart creation so much easy and simple. Just for that reason, I personally use BI Publisher Layout Editor to visualize my data in spreadsheets. All I need is a standard web browser and a mouse (or touch pad with my macbook pro), after a few drags & drops I have beautiful charts that are automatically linked together and I can start interacting with the charts to gain more insights from the data.

There are many common menus available in the Layout Editor’s ribbon tool bar and much more options available under Property section at the left hand side. Here is a quick video that I put together to show you how to create charts quickly and make them valuable. It covers the following items.

  • Bar/Pie Charts
  • Multiple Measures/Series
  • Legend Position, Legend Label Text and Formatting
  • Chart Title

Please let me know if you have any question or something that you want us to cover on the video or blog. Also, please share what are the most common property options that you use for the chart. We’re currently evaluating what property options to move to the ribbon bar to make your chart design even more simple for the next release.

Friday, June 17, 2011

Upgrade Existing BI Publisher 11g to 11.1.1.5

It’s already more than a month now since BI Publisher 11.1.1.5 was released at beginning of May. Have you already tried out many of the great new features? If you are already running on the first version of BI Publisher 11g (11.1.1.3) you might wonder how to upgrade the existing BI Publisher to the 11.1.1.5 version.

There are two ways to do this, one is ‘Out-Place’ and another is ‘In-Place’. The ‘Out-Place’ would be quite simple. Basically you will need to install the whole BI or just BI Publisher standalone R11.1.1.5 at a different location then you can switch the catalog to the existing one so that all the reports will be there in the new 11.1.1.5 environment.

But sometimes things are not that simple, you might have some custom applications or configuration on the original environment and you want to keep all of them with the upgraded environment. For such scenarios, there is the ‘In-Place’ upgrade, which overrides on top of the original environment only the parts relevant for BI and BI Publisher, and that’s what I’m going to talk about today.

Here is the basic steps of the ‘In-Place’ upgrade.

  1. Upgrade WebLogic Server to 10.3.5
  2. Upgrade BI System to 11.1.1.5
  3. Upgrade Database Schema
  4. Re-register BI Components
  5. Upgrade FMW (Fusion Middleware) Configuration
  6. Upgrade BI Catalog

There is a section that talks about this upgrade from 11.1.1.3 to 11.1.1.5 as part of the overall upgrade document. But I hope my blog post summarized it and made it simple for you to cover only what’s necessary.

Upgrade Document: http://download.oracle.com/docs/cd/E21764_01/bi.1111/e16452/bi_plan.htm#BABECJJH

Before You Start

Stop BI System and Backup

I can’t emphasize enough, but before you start PLEASE make sure you take a backup of the existing environments first. You want to stop all WebLogic Servers, Node Manager, OPMN, and OPMN-managed system components that are part of your Oracle BI domains. If you’re on Windows you can do this by simply selecting ‘Stop BI Services’ menu. Then backup the whole system.

Upgrade WebLogic Server to 10.3.5

Download WebLogic Server 10.3.5 Upgrade Installer

With BI 11.1.1.3 installation your WebLogic Server (WLS) is 10.3.3 and you need to upgrade this to 10.3.5 before upgrading the BI part. In order to upgrade you will need this 10.3.5 upgrade version of WLS, which you can download from our support web site (https://support.oracle.com)

You can find the detail information about the installation and the patch numbers for the WLS upgrade installer on this document.

Just for your short cut, if you are running on Windows or Linux (x86) here is the patch number for your platform.

  • Windows 32 bit: 12395517:
  • Linux: 12395517

Upgrade WebLogic Server

1. After unzip the downloaded file, launch wls1035_upgrade_win32.exe if you’re on Windows.

image

2. Accept all the default values and keep ‘Next’ till end, and start the upgrade.

Once the upgrade process completes you’ll see the following window.

image

Now let’s move to the BI upgrade.

Upgrade BI Platform to 11.1.1.5 with Software Only Install

Download BI 11.1.1.5

You can download the 11.1.1.5 version from our OTN page for your evaluation or development. For the production use it’s recommended to download from eDelivery.

1. Launch the installer by double click ‘setup.exe’ (for Windows)

2. Select ‘Software Only Install’ option

image

3. Select your original Oracle Home where you installed BI 11.1.1.3.

image

4. Click ‘Install’ button to start the installation.

image

And now the software part of the BI has been upgraded to 11.1.1.5. Now let’s move to the database schema upgrade.


Upgrade Database Schema with Patch Assistant

You need to upgrade the BIPLATFORM and MDS Schemas. You can use the Patch Assistant utility to do this, and here is an example assuming you’ve created the schema with ‘DEV’ prefix, otherwise change it with yours accordingly.

Upgrade BIPLATFORM schema (if you created this schema with DEV_ prev)

psa.bat -dbConnectString localhost:1521:orcl -dbaUserName sys -schemaUserName DEV_BIPLATFORM

Upgrade MDS schema (if you created this schema with DEV_ prev)

psa.bat -dbConnectString localhost:1521:orcl -dbaUserName sys -schemaUserName DEV_MDS


Re-register BI System components

Now you need to re-register your BI system components such as BI Server, BI Presentation Server, etc to the Fusion Middleware system. You can do this by running ‘upgradenonj2eeapp.bat (or .sh)’ command, which can be found at %ORACLE_HOME%/opmn/bin.

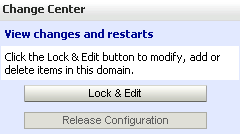
Before you run, you need to start the WLS Server and make sure your WLS environment is not locked. If it’s locked then you need to release the system from the Fusion Middleware console before you run the following command.
image 

Here is the syntax for the ‘upgradenonj2eeapp.bat (or .sh) command. 

upgradenonj2eeapp.bat
   -oracleInstance Instance_Home_Location
   -adminHost WebLogic_Server_Host_Name
   -adminPort administration_server_port_number
   -adminUsername administration_server_user

And here is an example:

cd %BI_HOME%\opmn\bin


upgradenonj2eeapp.bat -oracleInstance C:\biee11\instances\instance1 -adminHost localhost -adminPort 7001 -adminUsername weblogic


Upgrade Fusion Middleware Configuration

There are a couple things on the Fusion Middleware need to be upgraded for the BI system to work. Here is a list of the components to upgrade.

  • Upgrade Shared Library (JRF)
  • Upgrade Fusion Middleware Security (OPSS)
  • Upgrade Code Grants
  • Upgrade OWSM Policy Repository

Before moving forward, you need to stop the WebLogic Server. Here is an example.

cd %MW_HOME%user_projects\domains\bifoundation_domain\bin

stopWebLogic.cmd

And, let’s start with ‘Upgrade Shared Library (JRF)’.

Upgrade Shared Library (JRF)

You can use updateJRF() WLST command to upgrade the shared libraries in your domain. Before you do this, you need to stop all running instances, Managed Servers, Administration Server, and Node Manager in the domain.

Here is an example of the ‘upgradeJRF()’ command:

cd %MW_HOME%\oracle_common\common\bin

wlst.cmd

upgradeJRF('C:/biee11/user_projects/domains/bifoundation_domain')


Upgrade Fusion Middleware Security (OPSS)

This step is to upgrade the Fusion Middleware security piece. You can use ‘upgradeOpss()’ WLST command. Here is a syntax for the command.

upgradeOpss(jpsConfig="existing_jps_config_file", jaznData="system_jazn_data_file")

The ‘existing jps-config.xml file can be found under %DOMAIN_HOME%/config/fmwconfig/jps-config.xml and the ‘system_jazn_data_file’ can be found under %MW_HOME%/oracle_common/modules/oracle.jps_11.1.1/domain_config/system-jazn-data.xml.

And here is an example:

cd %MW_HOME%\oracle_common\common\bin

wlst.cmd

upgradeOpss(jpsConfig="c:/biee11/user_projects/domains/bifoundation_domain/config/fmwconfig/jps-config.xml", jaznData="c:/biee11/oracle_common/modules/oracle.jps_11.1.1/domain_config/system-jazn-data.xml")

exit()

Upgrade Code Grants for Oracle BI Domain

And this is the last step for the Fusion Middleware platform upgrade task. You need to run this python script ‘bi-upgrade.py‘ script to configure the code grants necessary to ensure that SSL works correctly for Oracle BI. However, even if you don’t use SSL, you still need to run this script. And if you have multiple BI domains (Enterprise deployment) then you need to run this on each domain.

Here is an example:

cd %MW_HOME%\oracle_common\common\bin

wlst c:\biee11\Oracle_BI1\bin\bi-upgrade.py --bioraclehome c:\biee11\Oracle_BI1 --domainhome c:\biee11\user_projects\domains\bifoundation_domain


Upgrade OWSM Policy Repository

This is to upgrade OWSM (Oracle Web Service Manager) policy repository, you can use WLST command ‘upgradeWSMPolicyRepository()’. In order to run this command you need to have your WebLogic Server up-and-running. Here is an example.

cd %MW_HOME%user_projects\domains\bifoundation_domain\bin

stopWebLogic.cmd

cd %MW_HOME%\oracle_common\common\bin

wlst.cmd


connect ('weblogic','welcome1','t3://localhost:7001')
upgradeWSMPolicyRepository()

exit()

Upgrade BI Catalogs

This step is required only when you have your BI Publisher integrated with BIEE. If your BI Publisher is deployed as a standalone then you don’t need to follow this step.

Now finally, you can upgrade the BI catalog. This won’t upgrade your BI Publisher reports themselves, but it just upgrades some attributes information inside the catalog. Before you do this upgrade, make sure the BI system components are not running. You can check the status by the command below.

opmnctl status

You can do the upgrade by updating a configuration file ‘instanceconfig.xml’, which can be found at %BI_HOME%\instances\instance1\config\coreapplication_obips1, and change the value of ‘UpgradeAndExit’ to be ‘true’. Here is an example:

<ps:Catalog xmlns:ps="oracle.bi.presentation.services/config/v1.1">
<ps:UpgradeAndExit>true</ps:UpgradeAndExit>
</ps:Catalog>

After you made the change and save the file, you need to start the BI Presentation Server. This time you want to start only the BI Presentation Server instead of starting all the servers. You can use ‘opmnctl’ to do so, and here is an example.

cd %ORACLE_INSTANCE%\bin
opmnctl startproc ias-component=coreapplication_obips1

This would upgrade your BI Catalog to be 11.1.1.5.


After the catalog is updated, you can stop the BI Presentation Server so that you can modify the instanceconfig.xml file again to revert the upgradeAndExit value back to ‘false’.


Start Explore BI Publisher 11.1.1.5


After all the above steps, you can start all the BI Services, access to the same URL, now you have your BI Publisher and/or BI 11.1.1.5 in your hands. Have fun exploring all the new features of R11.1.1.5!


image

Thursday, May 19, 2011

11.1.1.5 New Feature – More Data to Audit and Monitor

image
We believe Auditing and Monitoring capability for Reporting is crucial for the IT management and governance regardless if it’s enterprise level or department level deployment. So we are always committed to improve our BI Publisher Auditing and Monitoring capability since we introduced it for the first time
With the first release of 11g (11.1.1.3) we added this Auditing and Monitoring capability, which enables you to monitor who access to which report at what time.
With this new release of 11.1.1.5, we added more data to audit and monitor especially more BI Publisher reports specific information such as:
  • Report output format type
  • Layout Template name
  • Reporting locale
  • If the reports is run online (on-demand) or through the scheduler
  • Processing time
  • Reporting data size
  • Report error message
  • Scheduled job information
And these information can be all available through the database tables so you can use BI Publisher to generate your Auditing reports or visualize the data to gain more insights about how your users are doing on your reporting platform.
If you are interested in the power of the new BI Publisher Auditing and Monitoring, here is a video.


And, if you want to know how to enable the Auditing with the new data sets I’ll cover that below.

Enable Auditing Data

There are three things you need to do to enable the Auditing data.

Setup basic Auditing configuration

I have already talked about these steps before, take a look at these two posts for the detail.

  • How to Audit and Monitor BI Publisher Reports Access?
  • How to Visualize your Audit Data with BI Publisher?

    Run ‘xmlpserver_audit.sql’

    There is a SQL script that you can run to create an additional table, which will store more BI Publisher reports specific data to audit and monitor.
    Let’s take a look how to run the script step by step.
    1. Change the current directory to ‘%BI_HOME%user_projects/domains/bifoundation_domain/config/bipublisher/repository/Admin/Audit’.
    This directory should contain a file called ‘xmlpserver_audit.sql’ file.
    2. Run this script as SYS or SYSTEM user and alter the session user to the schema who owns the AUDIT tables.
    Example:
    Let’s say you have created the Audit schema with the RCU with ‘KAN_IAU’, then you can follow something like below.
    $ sqlplus / as sysdba
    SQL*Plus: Release 11.2.0.1.0 Production on Mon May 2 13:53:49 2011
    Copyright (c) 1982, 2009, Oracle.  All rights reserved.
    Connected to:
    Oracle Database 11g Enterprise Edition Release 11.2.0.1.0 - Production
    With the Partitioning, OLAP, Data Mining and Real Application Testing options
    SQL> alter session set CURRENT_SCHEMA = KAN_IAU;
    Session altered.

    Now you can run the ‘xmlpserver_audti.sql’ script. Note that, when you run you'll be prompted to enter the following three schema names.
    • Basic Auditing Schema name
    • Edit Auditing Schema name
    • View Auditing Schema name
    With the above example of using ‘KAN_IAU’ as your basic schema, it would be something like below.
    • KAN_IAU
    • KAN_IAU_APPEND
    • KAN_IAU_VIEWER
    Here is the example:
    SQL> @xmlpserver_audit
    Table created.
    Index created.
    Enter value for 1: KAN_IAU
    old 1: GRANT ALL on xmlpserver to &&1
    new 1: GRANT ALL on xmlpserver to KAN_IAU
    Grant succeeded.
    Enter value for 2: KAN_IAU_APPEND
    old 1: GRANT INSERT on xmlpserver to &&2
    new 1: GRANT INSERT on xmlpserver to KAN_IAU_APPEND
    Grant succeeded.
    Enter value for 3: KAN_IAU_VIEWER
    old 1: GRANT SELECT on xmlpserver to &&3
    new 1: GRANT SELECT on xmlpserver to KAN_IAU_VIEWER
    Grant succeeded.
    old 1: CREATE OR REPLACE SYNONYM &&3..xmlpserver FOR &&1..xmlpserver
    new 1: CREATE OR REPLACE SYNONYM KAN_IAU_VIEWER.xmlpserver FOR KAN_IAU.xmlpserver
    Synonym created.
    old 1: CREATE OR REPLACE SYNONYM &&2..xmlpserver FOR &&1..xmlpserver
    new 1: CREATE OR REPLACE SYNONYM KAN_IAU_APPEND.xmlpserver FOR KAN_IAU.xmlpserver
    Synonym created.
    After that you need to restart the WebLogic Server to take that in effect. Once that’s done, BI Publisher will start feeding all the auditing and monitoring related information into the auditing tables, and you should be able to start access to the data to create reports and visualize it with BI Publisher.

    Create Reports to Visualize

    If you have already finished the steps mentioned on the previous blog posts then you should already have a JNDI/JDBC connection created. If you haven’t yet, then take a look at the following post. 
  • How to Visualize your Audit Data with BI Publisher? Make sure you assign appropriate application roles to this data source connection so that you or any users who need to create reports for the BI Publisher Auditing and Monitoring data will have an access to the data source.
    image

    With this new set of data available, you can now start creating reports to gain more insights about how your users use the reporting platform and prepare for a better reporting experience by responding and adjusting promptly.

    Start with Sample Reports

    We’re planning to release a set of sample Auditing and Monitoring reports as part of our sample reports inside the catalog some time soon but till then you can start creating your own reports against the Auditing tables by using BI Publisher. For those looking for something quick, I’m attaching a sample report here
    You can download the above files and upload them to your BI Publisher 11g (11.1.1.5) environment from the BI Publisher Catalog UI, but make sure the following three points before you run.
    1. Change the Data Model reference inside the Auditing report to point to the Auditing Data Model that you uploaded
    audit_datamodel_reference
    2. Change the Data Source inside the Auditing Data Model to your JNDI connection
    audit_default_datasource
    3. Update the SQL query to point to appropriate schema name.
    audit_sql_query

    Path to Improve Reporting Experience

    Again, the Auditing is not just about collecting the auditing data and record it. It’s about how you as IT manager or administrator understand your users and reports on the reports environment in order to improve the reporting experience. The more you understand them the better service you can provide. We believe that the new release of BI Publisher 11.1.1.5 would provide you a wide range of data to help you understand your reporting environment better and quickly. Hope you’ll enjoy the power of new BI Publisher Auditing and Monitoring capability.
    Also, as always, we’re very interested in your feedback. Please let us know what do you think about the data currently available, the sample reports, any additional requirements or improvement suggestion.
  • 11.1.1.5 New Feature – More Data to Audit and Monitor

    image

    We believe Auditing and Monitoring capability for Reporting is crucial for the IT management and governance regardless if it’s enterprise level or department level deployment. So we are always committed to improve our BI Publisher Auditing and Monitoring capability since we introduced it for the first time

    With the first release of 11g (11.1.1.3) we added this Auditing and Monitoring capability, which enables you to monitor who access to which report at what time.

    With this new release of 11.1.1.5, we added more data to audit and monitor especially more BI Publisher reports specific information such as:

    • Report output format type
    • Layout Template name
    • Reporting locale
    • If the reports is run online (on-demand) or through the scheduler
    • Processing time
    • Reporting data size
    • Report error message
    • Scheduled job information

    And these information can be all available through the database tables so you can use BI Publisher to generate your Auditing reports or visualize the data to gain more insights about how your users are doing on your reporting platform.

    If you are interested in the power of the new BI Publisher Auditing and Monitoring, here is a video.


    And, if you want to know how to enable the Auditing with the new data sets I’ll cover that below.

    Enable Auditing Data

    There are three things you need to do to enable the Auditing data.

    Setup basic Auditing configuration

    I have already talked about these steps before, take a look at these two posts for the detail.

  • How to Audit and Monitor BI Publisher Reports Access?
  • How to Visualize your Audit Data with BI Publisher?

    Run ‘xmlpserver_audit.sql’

    There is a SQL script that you can run to create an additional table, which will store more BI Publisher reports specific data to audit and monitor.

    Let’s take a look how to run the script step by step.

    1. Change the current directory to ‘%BI_HOME%user_projects/domains/bifoundation_domain/config/bipublisher/repository/Admin/Audit’.

    This directory should contain a file called ‘xmlpserver_audit.sql’ file.

    2. Run this script as SYS or SYSTEM user and alter the session user to the schema who owns the AUDIT tables.

    Example:

    Let’s say you have created the Audit schema with the RCU with ‘KAN_IAU’, then you can follow something like below.

    $ sqlplus / as sysdba

    SQL*Plus: Release 11.2.0.1.0 Production on Mon May 2 13:53:49 2011

    Copyright (c) 1982, 2009, Oracle.  All rights reserved.

    Connected to:
    Oracle Database 11g Enterprise Edition Release 11.2.0.1.0 - Production
    With the Partitioning, OLAP, Data Mining and Real Application Testing options

    SQL> alter session set CURRENT_SCHEMA = KAN_IAU;

    Session altered.


    Now you can run the ‘xmlpserver_audti.sql’ script. Note that, when you run you'll be prompted to enter the following three schema names.

    • Basic Auditing Schema name
    • Edit Auditing Schema name
    • View Auditing Schema name

    With the above example of using ‘KAN_IAU’ as your basic schema, it would be something like below.

    • KAN_IAU
    • KAN_IAU_APPEND
    • KAN_IAU_VIEWER

    Here is the example:

    SQL> @xmlpserver_audit

    Table created.

    Index created.

    Enter value for 1: KAN_IAU

    old 1: GRANT ALL on xmlpserver to &&1

    new 1: GRANT ALL on xmlpserver to KAN_IAU

    Grant succeeded.

    Enter value for 2: KAN_IAU_APPEND

    old 1: GRANT INSERT on xmlpserver to &&2

    new 1: GRANT INSERT on xmlpserver to KAN_IAU_APPEND

    Grant succeeded.

    Enter value for 3: KAN_IAU_VIEWER

    old 1: GRANT SELECT on xmlpserver to &&3

    new 1: GRANT SELECT on xmlpserver to KAN_IAU_VIEWER

    Grant succeeded.

    old 1: CREATE OR REPLACE SYNONYM &&3..xmlpserver FOR &&1..xmlpserver

    new 1: CREATE OR REPLACE SYNONYM KAN_IAU_VIEWER.xmlpserver FOR KAN_IAU.xmlpserver

    Synonym created.

    old 1: CREATE OR REPLACE SYNONYM &&2..xmlpserver FOR &&1..xmlpserver

    new 1: CREATE OR REPLACE SYNONYM KAN_IAU_APPEND.xmlpserver FOR KAN_IAU.xmlpserver

    Synonym created.

    After that you need to restart the WebLogic Server to take that in effect. Once that’s done, BI Publisher will start feeding all the auditing and monitoring related information into the auditing tables, and you should be able to start access to the data to create reports and visualize it with BI Publisher.

    Create Reports to Visualize

    If you have already finished the steps mentioned on the previous blog posts then you should already have a JNDI/JDBC connection created. If you haven’t yet, then take a look at the following post. 

  • How to Visualize your Audit Data with BI Publisher?

    Make sure you assign appropriate application roles to this data source connection so that you or any users who need to create reports for the BI Publisher Auditing and Monitoring data will have an access to the data source.

    image


    With this new set of data available, you can now start creating reports to gain more insights about how your users use the reporting platform and prepare for a better reporting experience by responding and adjusting promptly.

    Start with Sample Reports

    We’re planning to release a set of sample Auditing and Monitoring reports as part of our sample reports inside the catalog some time soon but till then you can start creating your own reports against the Auditing tables by using BI Publisher. For those looking for something quick, I’m attaching a sample report here

    • Sample Auditing Report
    • Sample Auditing Data Model

    You can download the above files and upload them to your BI Publisher 11g (11.1.1.5) environment from the BI Publisher Catalog UI, but make sure the following three points before you run.

    1. Change the Data Model reference inside the Auditing report to point to the Auditing Data Model that you uploaded

    audit_datamodel_reference

    2. Change the Data Source inside the Auditing Data Model to your JNDI connection

    audit_default_datasource

    3. Update the SQL query to point to appropriate schema name.

    audit_sql_query

    Path to Improve Reporting Experience

    Again, the Auditing is not just about collecting the auditing data and record it. It’s about how you as IT manager or administrator understand your users and reports on the reports environment in order to improve the reporting experience. The more you understand them the better service you can provide. We believe that the new release of BI Publisher 11.1.1.5 would provide you a wide range of data to help you understand your reporting environment better and quickly. Hope you’ll enjoy the power of new BI Publisher Auditing and Monitoring capability.

    Also, as always, we’re very interested in your feedback. Please let us know what do you think about the data currently available, the sample reports, any additional requirements or improvement suggestion.

  • Thursday, May 12, 2011

    BI Publisher 11g - 11.1.1.5 is here!

    New Oracle BI Publisher 11g Release 11.1.1.5 is released! Here is a list of the new features.

    clip_image002

    Much Faster Interactive Reporting Experience

    Using BI Publisher to interact with your data is snappy. Generating interactive report output uses less memory and is faster than ever. BI Publisher’s highly optimized, three layer caching mechanism provides a highly responsive, interactive reporting experience.

    New Interactive Component - List

    The List component is a nifty way to filter data in an interactive report. When you click values in the list, BI Publisher automatically filters the data in the report. In the Layout Editor you can set the orientation of the List to be horizontal or vertical and over 30 other options to make it visually appealing for your consumer needs. Lists are another great way to interact with your report to gain more insight.

    clip_image004

    clip_image007

    Both Native and Web Apps for iPhone & iPad

    More and more business tasks are performed on mobile devices like iPhone and iPad, so why not browse reports and interact with your data on your mobile device with BI Publisher? Simply access your BI Publisher reports with Safari or other browsers on your iPad or iPhone, or install the Oracle BI Mobile App for iPhone and iPad to enjoy the same rich, fast interactive reporting experience as on your desktop or laptop.

    Enterprise Reporting Platform for Oracle - E-Business Suite

    BI Publisher now supports Oracle E-Business Suite’s data level security based on user responsibility and allows you to switch responsibilities on the fly. You can use BI Publisher 11.1.1.5 to view, manage, and deliver reports against E-Business Suite data and join and aggregate with data from other data sources. Utilities are available to help you convert from Oracle Reports and upgrade to BI Publisher 11g. Start taking advantage of many of the great BI Publisher 11g new features with your E-Business Suite data today.

    clip_image008

    clip_image010

    New Data Source – Local Excel File

    Often times you need data in Excel to supplement other data or you need to visualize it quickly. BI Publisher 11.1.1.3 added Excel files as a data source so you could create a report against Excel data located on the server. BI Publisher 11.1.1.5 goes one step further. Now you can upload Excel spreadsheets from your local machine directly to a Data Model. Create reports from the uploaded Excel spreadsheet or join it and aggregate it with other data sources. Reporting with local Excel files is a great way to empower your users to visualize and share data easily and still maintain a centralized report environment.

    New Template Type - Excel Template

    Some users just love Excel, so we added Excel as a report layout design option. In addition to the existing template options like BI Publisher Templates, RTF, PDF, Flash, and others, you can now use Excel to design your report the way you want, using custom functions and Excel Macros to split data across multiple sheets, calculate values dynamically, then share with your colleagues.

    clip_image012

    clip_image014

    Auditing and Monitoring

    Auditing is not just about compliance, it’s a way to improve customer service by understanding what your users like to do, when and how they access and view reports. BI Publisher 11.1.1.3 included a framework to help IT Administrators collect data required for auditing. BI Publisher 11.1.1.5 enhances the audit and performance information captured and introduces a method to store the data into a database. Now you can use BI Publisher to visualize, analyze and report on your auditing and performance information.

    New Output Format Type – Native Excel 2007 Output

    Now you can download your report as Excel 2007 format and open it with the latest Excel on both Windows and Mac with high fidelity formatting and layout. You can use repeating groups in your report to automatically group data in separate worksheets. With this format option the downloaded Excel file is 70% smaller compared to other Excel output types, which makes it easier to share your report in Excel with your colleagues.

    clip_image015

    clip_image017

    Reports Development Life Cycle Management

    Developing reports often involves multiple phases and processes before going live. Reports need to be moved to a testing environment after the development and then to the production environment. You can use the new BI Publisher Catalog Utility to move your reports either one at a time or in batch from one environment to another all without shutting down servers so users can continue to generate the mission critical documents and reports they need.

    Want to learn more about BI Publisher?

    clip_image019

    Follow us @bipublisher for our latest news, inside scoop, or tweet us your feedback!

    clip_image021

    Connect with other BI Publisher professionals!

    clip_image023

    Find How-to and solutions over 500 articles!

    clip_image025

    Subscribe our channel and check our introduction and How-to videos!

    clip_image027

    Ask any question you have and get answered at our Discussion Forum!

    Saturday, March 12, 2011

    Share and Deliver BI Publisher Reports in Multiple Languages

    global flags

    When you share your reports with someone who speak and read in different languages you want your reports to be shown in their language, right ? Well, translating reports with BI Publisher is not only easy but also reduces the maintenance cost a lot.

    Many of us in the BI Publisher product development team used to work in Globalization and Multi Lingual support, which enables Oracle products and applications to be used in many different languages and countries and territories.  And we have a lot of experience in this area. In fact, being a strategic reporting platform for Oracle EBS, PeopleSoft, JD Edwards, Siebel, and many other Oracle application products, our customers from all over the world are generating thousands of thousands of reports, including out-of-the-box pre-developed reports from Oracle and customer created or customized reports, in their own local language everyday as they operate and manage their business.

    Today, I’m going to talk about this very topic, how to translate my reports with BI Publisher 11G.

    Translation Grows, not the Numbers of the Reports

    Most of the reporting tools, regardless if it’s traditional or new, always take this translation on the back burner. They require their users to copy an original report and translate the whole thing. So when you want to support additional10 languages you will need to have 10 copies of the original. Imagine when you have 50 reports then you will end up having 500 reports (50 x 10) ! Now you need to maintain these 500 reports, whenever you need to make a change in a report you need to apply the same change to the other 10 reports. And as you imagine this is not only a nightmare for IT managements but not acceptable especially for the applications like Oracle EBS that supports over 30 languages.

    So first thing we did was, very simple, we separated the translation out of the report and marry it to the report only at the report generation. This means, regardless of how many languages you need to support you need to have only one report and translation files for the 10 languages, which would contain the translated letters and words. So let’s say you have 50 reports and need to support 10 languages for those reports you still have only 50 reports and each report now has 10 language translation files. Yes, translation is the one should grow as you add more languages to support, not the report itself!

    And second, we provide the translation files in XLIFF format, which is an international standard XML based format to exchange and maintain translation strings. So once you generate the XLIFF files for your reports with BI Publisher then you can work with any translation vendors in the world to make a mass translation or you can translate the XML files by yourself by manually updating the translatable strings presented in this text file.

    Lastly, we made it easier to manage the translation process starting from generating the XLIFF files to uploading the translated XLIFF files back to the BI Publisher server. You can generate, download, upload the XLIFF files from the BI Publisher’s Web interface with your browser and you can see the translated reports right away without needing to shutdown or restart your server. While the translated reports are displayed based on your language preference setting you can also specify a different language when you schedule or deliver the reports so that they can be generated in your customer’s preferred language.

    What Can I Translate?

    When it comes to translation there are three things.

    First, report content translation. When you receive a report you like to see the content like report title, section title, comments, annotation, table column header, and anything that are static and embedded in the report. in your preferred language. We call this Reports Content translation.

    Second, when you open a report online you might want to see not only the report content being translated but also the report UI, such as report name, parameter name, layout name, and anything that would help you to navigate around the reports, to be translated in your language. We call this Reports UI translation. And this separation of the Reports Content and Reports UI translation makes it very useful especially when you want to navigate through the reports in your preferred language UI but want to generate the reports in your customer’s preferred language. Imagine you are English native speaker and need to generate and send a report to your customers in China. You like to see the report name, parameter name in English so that you can comfortably navigate to the report and generate the report output, but like to see the report generated in Chinese so that the your customers in China can understand the report when they receive it.

    And lastly, you might want to see even the data presented in the report to be translated. For example, you might want to see product names in an Order Status report to be translated based on the report viewer’s language preference. We call this Reporting Data translation. Since this Reporting Data translation is maintained at the data source level such as Database tables along with the main data, you need to prepare the translation at the data source level first. Then, you want to make sure that your query is switched accordingly based on the language preference setting so that the translated data will be retrieved.

    How to Translate BI Publisher Reports?

    Now when it comes to ‘how to translate BI Publisher reports?’ the main focus here is about the translation for the Report Content and Report UI. And I just created this video to show you how to create and manage the translation with BI Publisher 11G. Please take a look at the clip below.


    In today’s business world, customers and suppliers are from all over the world regardless of the size of the company or organization. Supporting multiple languages for your reports is no longer something ‘nice to have’, it’s mandatory. BI Publisher is designed to support multi lingual reports from the beginning without any extra hidden cost of license or configuration like other reporting tools such as Crystal Reports. You can support additional languages translation at any time with the very simple steps shown in the video above. Happy translation!

    Please share your translation experience with us! 

    Thursday, September 2, 2010

    Oracle BI Publisher 11G Installation

    Have you already installed BI Publisher 11G and started playing around ? Well, as much as I was excited about the release news when I came back from my big vacation, I had a bit of bumps on the road of installing until logging into the initial home page. First, I couldn’t proceed on the installer wizard steps more than step 4, then after having fixed the problem I still couldn’t start some BI services and then couldn’t open BI Publisher login window.

    Well, finally figured out the root cause of the issue and its solution. Basically, that my PC environment was Windows XP on a VM (Parallel/Mac) and it’s running on DHCP. And the installer and some components (it’s BI Cluster Controller Server) don’t like it. So I needed to install a Loopback Adaptor and setup a static IP address, and then register that with machine name in Window’s etc/host file properly.

    After that is done and cleared up the failed installation completely, the installation worked like a charm. It took about one hour or so and was so smooth that I don’t even remember what I was frustrated about! Anyway, hope your installation went smooth without hassle like the ones I had. But if it didn’t you might want to proceed reading and hope this helps you to get going.

    Installation

    In order to install BI Publisher 11G you need to get the BIEE 11G installation  package either from OTN or eDelivery. Then you create a repository in your database by using RCU (Repository Configuration Utility) before you start installing the BIEE 11G.  I’m not going to talk about the detail steps of the installation here, you can find many posts on other blogs out there or the installation guide about such detail steps with screenshots. The installation steps itself is pretty simple. However, if your network is not configured well then you will get in trouble big time. So make sure your network configuration before you start installing BI 11g.

    Network Configuration

    This is mandatory and really critical thing to do especially when you are trying to install onto your laptop or PC desktop with DHCP setting.

    Basically there are three things to do before the installation in terms of the network setting.

    1. Make sure if you have installed MSFT loopback adapter.
    2. Set a static IP address to the loopback adapter network.
    3. Set the C:\WINDOWS\system32\drivers\etc\host file with a computer name and the static address you set to the loopback adapter.

    All the detail can be found in this Oracle Database 11GR2 Installation guide. Click the link, it gets you directly to the network configuration section.

    But one tricky thing is a domain name for your machine name such as ‘us.oracle.com’. If you are not sure about the domain name then don’t include it in the etc/host file. My example is below.

    # For example:
    #
    #      102.54.94.97     rhino.acme.com          # source server
    #       38.25.63.10     x.acme.com              # x client host

    127.0.0.1       localhost

    127.0.0.1       .psf

    10.10.10.10   knishida-vm1 

    Make sure you reboot your machine once you have set the network configuration, then start the BI11g installation. Without this proper setting you will hit the following issues:

    1. You can't proceed the installation steps after where you type username/password for weblogic user.
    2. Your ClusteringControler or PSServer doesn't start
    3. You can't login to Answers or any other BI apps
    4. You can't even open BI Publisher login window
    5. You can't open RPD online

    I’ve already installed, Any workaround to fix it manually ?

    If you have already installed BI11g and having the above issues you can workaround by setting up the etc/host file properly. If there is still a problem starting up the BI Clustering Controller Server then remove a domain name, which is 'us.oracle.com' in my case, from NQClusterConfig.INI located under C:\biee11\instances\instance1\config\OracleBIApplication\coreapplication (I installed the BI11g under C:\biee11.) if any. After removing all the domain name restart only the cluster control server manually from the Fusion Control (EM) then you should be able to start the cluster control server, and then you will be able to open BI Publisher page and login, or login to BI first then access to BI Publisher page. However, this workaround might be wiped out the next time you stop and start all the BI services. As you have realized by this time, regardless of whether you select ‘Simple Install’ or ‘Enterprise Install’ at the installation the BI Clustering Control Server gets installed. And you need that to access to the BI Server even if there is only one, and hence you need that to login to BI Publisher.

    Need to Reinstall or Cleanup ?

    So, while you can workaround the network issue as mentioned above I still strongly recommend that you review the network configuration and do a fresh install again. The issue like above can be work around temporally, but the workaround will be needed to perform every time you start the BI servers, which is not going to make you a happy camper.

    When you do try another fresh installation then make sure you completely delete the original one by following the sequence mentioned in the installation guide. If you have something still left over from the previous installation you will get an error message during the installation. Here is a brief highlight of the steps in the order.

    1. Run the deinstall script and select the Deinstall instances managed by a WebLogic domain option.

    2. Stop all Oracle Business Intelligence processes and servers, including all OPMN-controlled components and JEE components.

    3. Drop the Metadata Services (MDS) and Business Intelligence Platform (BIPLATFORM) schemas using RCU.

    4. Run the deinstall script and select the Deinstall the Oracle home option.

    5. Deinstall the Oracle Common home manually or by running the deinstall script that it contains.

    6. Use the Oracle WebLogic Server uninstaller to uninstall WebLogic Server.

    7. Remove the Oracle home (if necessary).

    8. Remove the Middleware home and any other homes (Domain home, Applications home, and Instance home) that might have been installed outside of the Middleware home.

    After following the steps documented in the installation guide to delete everything, make sure you don’t have any entry in the registry if you are installing onto Windows system. Especially the following stuff.

    1. Remove all the registry entries that contains the Oracle - OHxxxxx. (e.g. HKEY_LOCAL_MACHINE\SOFTWARE\ODBC\ODBC.INI\coreapplicatin_OH868503665)
    2. If you have followed the steps mentioned above you shouldn’t see this. But if you still see this Oracle Common Home menu (‘Oracle – OHxxxxx’) from the Start –> Program File menu then remove it by going to ‘C:\Documents and Settings\All Users\Start Menu\Programs’ in the registry then delete such.
    3. Even If you have followed the steps above you might still see the OPMN and Node manager windows services, you can do this by deleting these entries from registry, HKEY_LOCAL_MACHINE/SYSTEM/CurrentControlSet/Services

    Share Your Experience!

    Well, hope you have installed BI Publisher 11G successfully and start playing around and getting excited about the new features and products as I do now. But if you have found any issue and workaround during the installation and configuration please share!